Wednesday, January 29, 2014

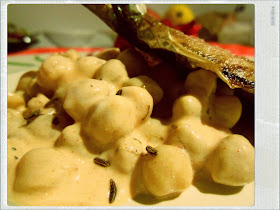
Cauliflower with Jerusalem Artichoke Puree and Pickled Okra | You've Got Meal!


Vegetarians out there, rejoice! You might make a meat free man out of me yet, but you still have a long way to go regarding dairy. This vegetarian combo was both light and fulfilling, which I can’t say about a lot of meatless meals I had. You can make this recipe vegan all the way, but removing butter from the puree wasn’t really an option for me.


You’re going to need: 
  • 1 small cauliflower, broken into small florets, 
  • cumin seeds, 
  • chick peas, 
  • parsley, 
  • olive oil, 
  • equal quantities of Jerusalem artichoke and potatoes (about 350 grams each), 
  • butter, 
  • salt, pepper
  • (optional) goat cheese.


  1. Mix the cauliflower florets with the cumin seeds, salt, pepper and olive oil and cook in the medium hot oven for 20 minutes. 
  2. Add in a handful of chickpeas from a can and cook for another 5 minutes, just enough to heat through – careful here, the more you let the beans in, the drier they will get. 
  3. Put the cauliflower and chickpeas on a plate and sprinkle goat cheese and chopped parsley on top.


  1. For the puree, clean/peel the Jerusalem artichokes and potatoes and boil them in some salted water. 
  2. When boiled through, remove the water, add some more salt, a dash of pepper and about 50-75 grams of butter. 
  3. Use a fork or a masher to make your mash – or a food processor.  


What can I say about the pickled okra, except the fact is awesome and it goes really well with the vegetarian feel of the whole dish. What’s not to love: okra pickled in apple vinegar with sugar, celery, bay leaves and lots of chili and just a hint of garlic.


Enjoy,

Sunday, January 26, 2014

Cod, Couscous and Zucchini | You've Got Meal!


Let me assure you right from the beginning that there is more to this dish than an enumeration of the ingredients listed above. The fish works great with the fluffy, flavored couscous, the mellow zucchinis elevate the combo and a harissa-yoghurt sauce brings everything together. 

So let’s talk ingredients: 
  • a couple pieces of cod (we used some frozen ones), 
  • about 150 grams of couscous,  
  • sun dried tomatoes, 
  • spring onions, 
  • 2-3 garlic cloves, 
  • 2 medium zucchinis, 
  • 1 lemon, 
  • Greek yogurt,
  • Harissa sauce.


  1. Start of by cooking the zucchini: cut them in medium sized chunks, give them a good splash of olive oil, a pinch of salt and pepper and place them in an oven proof pan, with 2 halves of a lemon. Cook in the preheated oven, medium-high heat for around 20 minutes. Taste from time to time, just to make sure you don’t overcook the vegetables.
  2. Next, the couscous. I think that the only thing simpler than cooking couscous is eating cereals for breakfast. Put the couscous in a bowl, pour hot water over it until in covers it for about 1 cm. Use some cling film to cover the bowl and wait until all the liquid is absorbed. Use a fork to fluff the couscous. Mix in some finely chopped sun dried tomatoes with a couple tbs. of their oil, crushed garlic and spring onions.
  3. You can cook the cod any way you feel like it: grilled, seared, in the oven. We rolled the cod pieces in some cornmeal crust and then we fried the fish in some olive oil until it got a beautiful golden crust.
  4. Plate everything, including  a healthy amount of yoghurt and Harissa sauce next to the fish and veggies. Grab your favorite salad mix (indulge yourself with that little cheat) and place a nice hand of the crunchy leaves, sprinkle a splash of the baked lemon juice on top. Be careful though, the juice gets a fair amount of bitterness from the zest when cooked, so it may be a little bit overwhelming. 


Trust, you can’t go wrong with this combo, it has everything you need – fish, veggies, couscous and a hell of a kick from the baked lemon juice. You can choose to replace the fish with another type, fresh herring or mackerel. Also, if you can’t get Harrisa sauce, just make your own, boil down some passata juice mixed with tomato concentrate, hot pepper jam, cumin, all spice, sugar, a touch of rose water and saffron. Or whatever  condiments you feel like having in your sauce – it’s just that easy.

Enjoy,

Thursday, January 23, 2014

Pink Grapefruit Pancakes | You've Got Meal!


Weekend breakfast is probably my favorite meal of the week. I wouldn't actually call breakfast what we have during the week ( a fruit, a yogurt or a healthy juice to name the best choices) so, for me, having a nice breakfast with hubby during the weekends it feels like a special occasion. I LOVE my eggs and bacon or any other egg breakfast for that matter, but I also appreciate a sweet meal from time to time.


Am I the only one that finds making pancakes so relaxing?

This last weekend I woke up with one thought in my mind: I have to make a breakfast that included some fruit and I want pancakes. The only fruit we had were pink grapefruits. I love the recipe for buttermilk pancakes, but I only had some Greek yogurt, so I decided to try a version with grapefruit juice and Greek yogurt.


I used:

  • 3/4 to 1 cup flour
  • 1 tbsp baking powder
  • 1/2 tsp salt
  • 1/4 cup brown sugar
  • 1/2 cup grapefruit juice
  • 1 egg
  • 150 ml Greek yogurt (5 oz)
  • 1 drop red food coloring (optional)
 

Making the batter:
  1. Stir the yogurt just for a bit to make it creamier.
  2. Pour the egg on top of the Greek yogurt and mix well, until the egg is beaten and perfectly incorporated into the yogurt.
  3. In the same bowl, add the grapefruit juice and mix.
  4. At this point you can add the dry ingredients one at a time and you can even use a hand mixer to get the job done faster.

 Method:
  1. Cut some tiny pieces of grapefruit and put aside.
  2. Brush a skillet with oil / spray it with cooking spray and when the oil is heated pour with a small ladle the batter to form one pancake at a time.
  3. Add some pieces of grapefruit  on top of the pancakes before turning it on the other side.
  4. Serve with powder sugar for a nice twist.


Enjoy,

Tuesday, January 21, 2014

Oven Roasted Carp and Peas | You've Got Meal!


Big shocker right in the title, Internet – you can actually eat carp and it’s delicious. I’ve seen a lot of people who consider carp kind of a second-hand fish and don’t really consider it worthy for their kitchen. I can assure you that that is not the case. Fresh, river caught carp can be a knock-out at a table (in the good sense of the way) and it can hold its own against more popular fresh water fish like trout. The thing to remember here is that the bigger the carp is, the fattier it will be, so make sure to pick your fish accordingly. 


So, if you’re going for a nice oven roasted  filet, pick a leaner cut. But, let’s say, for a fisherman’s sour soup (yum, it makes my mouth watery just by typing it) or for grilling on a coal barbecue you can get a fattier piece (there is such a thing called carp belly and it’s great for this last category, with some grilled vegetables and some thyme flavored light brine).  


So let me take you through this recipe that literally takes to cook 15 minutes. You’re going  to need a lean filet of carp (about 200 grams per person), some fresh thyme leaves, a can of peas, some garlic cloves, salt, pepper and olive oil. 
  • Simply rub salt, pepper on the fish and sprinkle with the thyme leaves and olive oil. 
  • Place the carp on an oven proof rack, pop a tray under it so any juices won’t trickle directly on the oven. 
  • Cook the fish on high heat for 13-15 minutes. In the last minute, heat up some olive oil in a pan, cook a couple of whole garlic cloves for 30 seconds, then give the drained peas the same amount of time to heat through, then add some salt and pepper. 


Plate the carp with the peas and sprinkle some lemon juice on top and you’re done. Nothing fancy, nothing elaborate, everything is done in 15 minutes. If you’re looking to try some carp, don’t overdo it in your first recipe, try something simple, with only a couple of flavors, that can give you an idea of the taste of the fish and I’m sure you’re going to be back at your fishmonger for more carp.


Enjoy,

Saturday, January 18, 2014

Turkey Meatballs | You've Got Meal!


We stopped at this recipe one of these day just before our cooking inspiration was close to zero. You know those days when you have no special cravings, no idea what to cook and you just stare at your fridge and freezer, but no option satisfies you.

We got lucky when we spotted a large piece of turkey breast in the freezer. Turkey meat is a nice and lean meat that is very versatile. If you find the meat dull and you have a bigger piece it is a great idea to grind it or part of it for meatballs or burgers to get a great flavor. It is easier to add the flavor you want in meatballs or burgers.


That being said, we used about 600 grams of ground turkey and made some nice meatballs and served them with mashed sweet potatoes and some pickled cauliflower.


You will need:

  • 600 g ground turkey
  • 1 small onion, finely chopped or grated
  • 2 carrots, grated
  • 2 eggs
  • 2 garlic cloves, crushed
  • 3/4 cup breadcrumbs
  • 1 tbs salt
  • 1 tsp pepper
  • 1 tsp paprika
  • 1/2 handful chopped fresh parsley
For the mashed sweet potatoes:
  • 1 large sweet potato
  • 2 medium potatoes (basically you need to have a 50/50 ratio of potatoes and sweet potatoes)
  • 1 tsp salt
  • 1 tsp pepper
  • 50 g butter
  • 1/2 tsp grated fresh ginger


  1. Mix all the meatball ingredients in a large bowl and form balls from about 1 tbsp of composition.
  2. Heat 2-3 tbsp olive oil in a skillet and fry the meatballs on all sides, about 7 minutes , until brown.
  3. You can take them out on a paper towel to remove excess oil.
  4. For the mash, boil the potatoes, mash them, add the butter, ginger and the seasoning and mix well.


Enjoy,

Wednesday, January 15, 2014

Tuna and Chili Pasta | You've Got Meal!

No Heat Pasta Sauce * Simple Pasta * Tuna Pasta


This is probably one of the simplest recipe on our blog and it is a great way to use an ordinary can of tuna. Pasta dishes are usually great fast solutions for weekday dinners or home made lunches in a hurry. This one is even more convenient because it only takes as much time as the pasta needs to boil and actually the skill to boil water is the only one required. :)


The final taste is quite complex, rich from the tuna, balanced by the lemon, the parsley give it the freshness and the chili just the kick it needed. The only tip I would give, especially since the dish is really affordable, is to use a nice quality tuna flakes can, being the main ingredient it really makes the difference.


Ingredients:
  • 250 g store-bought spaghetti
  • 1 185 g tuna can 
  • 1 small red onion (or half of a big one)
  • 1 hot pepper ( 1 used 3 tiny chilies)
  • 2 garlic cloves
  • 1 tbsp capers, drained
  • 1/2 handful of parsley
  • 2 tbsp oil
  • 2 tbsp lemon juice


  1. Pour the pasta in boiling water with salt and a drizzle of olive oil (for extra shine).
  2. Cook the pasta according to the package instructions. For our spaghetti we boiled them for 7 minutes.
  3. While the spaghetti are boiling, finely chop the onion, the chili and the parsley.
  4. Crush the garlic and drain the capers.
  5. Add all the ingredients in a big bowl.
  6. Add the canned tuna.
  7. Mix the lemon juice with the olive oil and pour the resulting sauce over the ingredients.
  8. Toss everything until it is well combined.
  9. Drain the pasta, add them to the sauce and mix well.


It is barely cooking, but the result is really delicious and comforting it is it worth saving the recipe for hard times, lazy nights, pasta craving or any other culinary emergencies.
I hope you try.


Enjoy,

Sunday, January 12, 2014

Sun-dried Tomato and Artichoke Bruschetta | You've Got Meal!


One of the most important things that you’ll ever hear from any professional chef is to be organized in your kitchen. Manage your ingredients, keep things tidy, plan your cooking and so on and so forth. We are not professional chefs in the You’ve Got Meal kitchen, but this whole organizing your meals makes perfect sense it you’re a bruschetta fanatic like we are. 


We always have at hand in the pantry some sun-dried tomatoes, artichokes, parmesan, capers, anchovies, cipolline borettane, olive oil, olives, etc. Of course most of the times we don’t have the whole list, but you can cook some darn right delicious treats with only a couple. And so it just happens that we only had some tomatoes and artichokes on hand the other day. 


Making the bruschetta is mega easy, start of by cutting some slices of bread (baguette), not too thick. When we use sun-dried tomatoes we tend not to use olive oil, just because the tomatoes are kept in a flavored oil, same thing for the artichoke hearts.


  • Place a piece of tomato, topped with an artichoke heart – you can choose to cut that if you find it too big. 
  • Next, place one or two fresh leaves of basil and sprinkle with some grated parmesan. No salt, there’s plenty of that in the vegetables and cheese, maybe a dash of pepper. 
  • Cook the bruschetta in the oven for 7-10 minutes and serve warm. 


The conclusion here keep your pantry stocked with at least a couple from those ingredients, they will make a world of a difference when you have to whip something up when you get a last minute visit or when you get the munchies. 


One of the rules we do have about our bruschetta is to keep it simple, not too many ingredients of spices. Keep in mind that just a couple of flavors combined in the right way can do a lot better than trying to mix in a ton tastes.  So, go at it, try and mix them and see which combo suits you better in a bruschetta, there’s no way you’re not going to enjoy it.


 Enjoy,

Friday, January 10, 2014

Fresh Sardines with Chickpeas and Beets | You've Got Meal!


Butterfly sardines roasted or grilled * Beets and carrots salad * Boiled chickpeas with yogurt-harissa sauce


There are so many advantages to cooking fresh sardines that it’s hard for me to start talking about those wonderful fish. Sardines are super healthy, rich in good fats, super cheap and easy to find fresh everywhere. They’re like the fast food of the seas, except the part with the health benefits. I’ve seen a number of people who only ate canned sardines and that’s a pity, because they are missing out on something great.


Cooking this tiny tasty treat is super easy and fast, it actually takes longer to clean and gut the sardines. For this recipe, we decided to “butterfly” the fish, it looks nice in the plate and cooks faster – even though this is not such a big issue when cooking sardines. In order to butterfly the sardine, cut off the head, clean the guts out, place the fish belly side up and use your thumb to press down, near the spine of the fish, length wise, up to the tail. Remove the spine carefully pulling it out from the meat. I’m not sure if my description helps, but give it a try, it’s actually a very simple and fun process. 


Simply grill the seasoned meat or cook it in the oven – we went for the 2nd one, cooking the fish for 5 minutes at 180 Celsius. 


To accompany the fish, grab 200 grams of canned chickpeas (or boil your own) and mix them with a couple tbs. of Greek yoghurt and 1-2 tsp. of extra hot harissa sauce or another variety of a more dense spiced tomato sauce. Sprinkle some crushed (and optionally toasted cumin seeds on top).


To add some crunch to the fish and vegetable, grate a small beet and 1 or 2 carrots, season with salt, pepper, olive oil (just a small dash), the juice of 1 lemon and a 4-5 finely chopped mint leaves for freshness. 


To keep in the healthy note of the whole dish, you can sprinkle some flax seeds in the beet salad- those tiny bastards are great for you, an amazing source of fatty acids.


So there you go, super easy, super fast and super fast. Just make sure you take out the trash after cleaning those sardines, those guts are not that friendly for the nose.  


Enjoy,