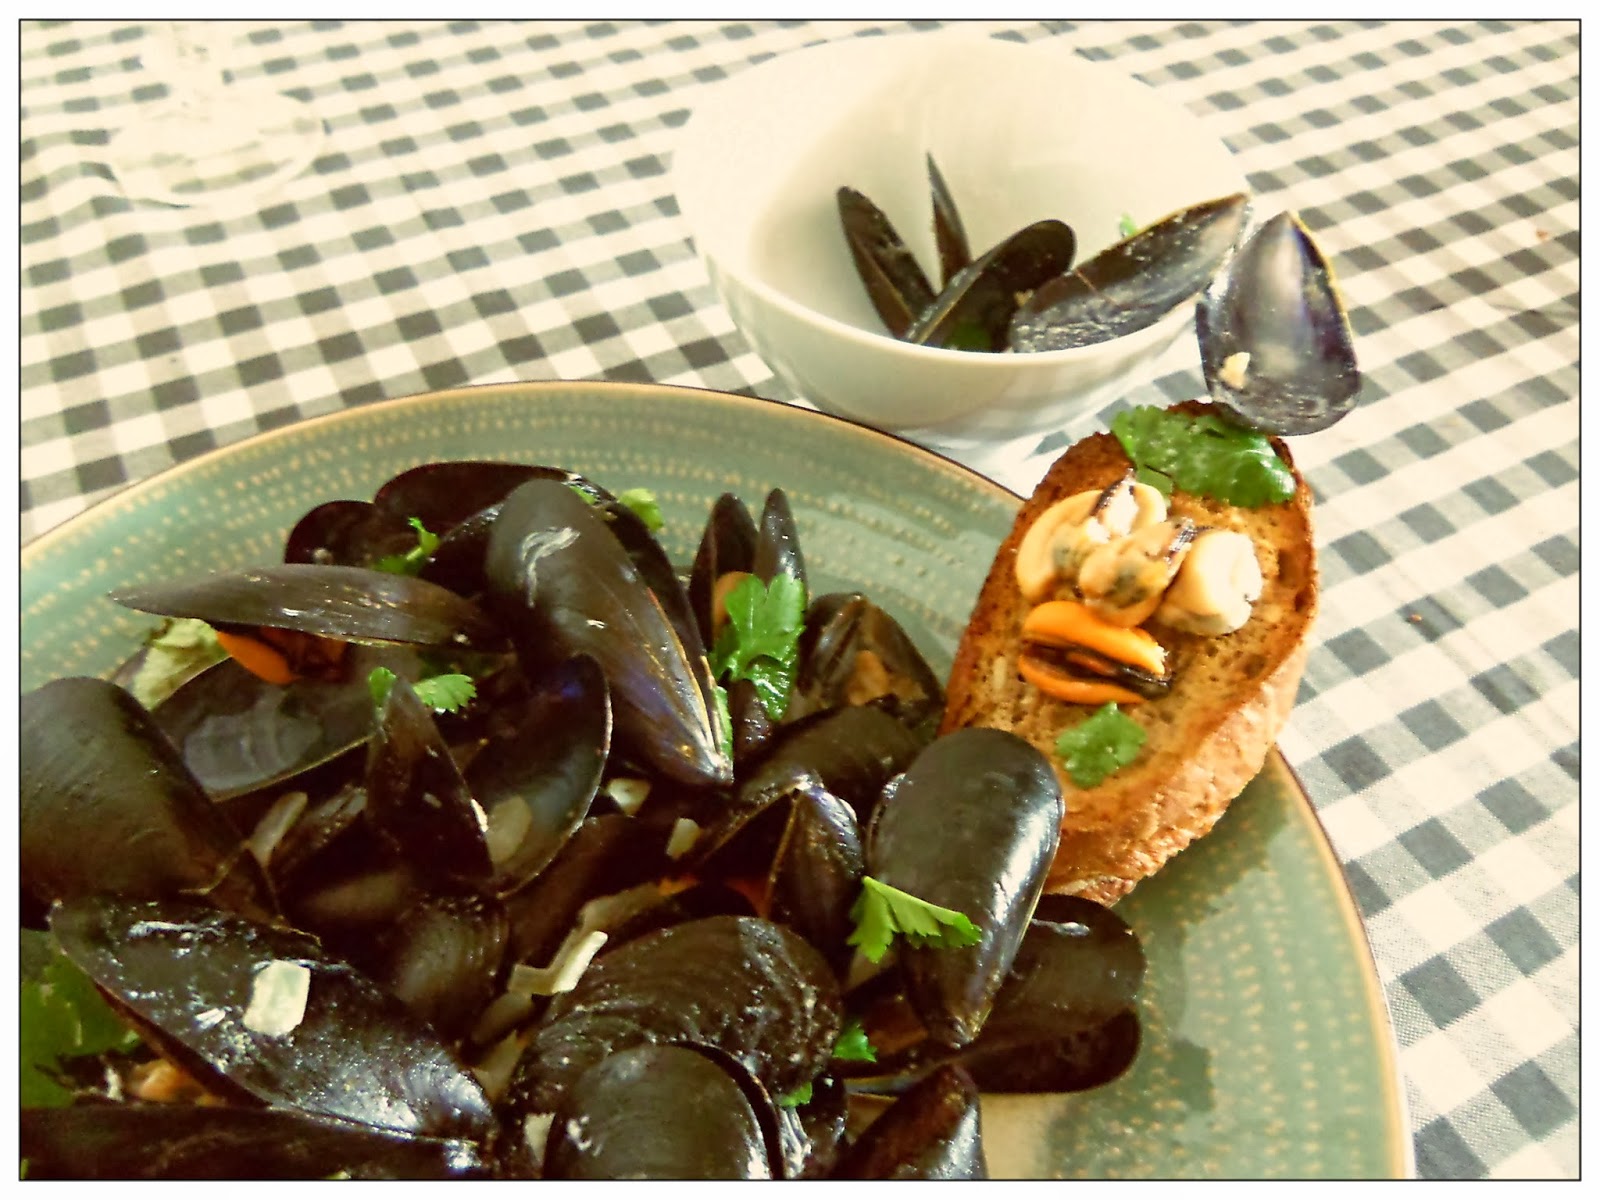
Pin It button on image hover

Thursday, February 27, 2014

Mussels in White Wine Sauce (Moules Mariniere) | You've Got Meal!


Mussels are one of our favorite choices when we want to cook seafood in the Youvegotmeal! kitchen, and for obvious reasons. They’re delicious, light, easy to cook and look great at the table. 


Unfortunately, when dealing with fresh mussels the most difficult part is cleaning them, but you can’t skip this part, especially when you’re using them whole. Scrub the mussels with a wire wool and make sure to remove the “mustache” or “beard” of the clam, meaning the algae that sometimes hangs from inside the mollusk.


 Cooking the mussels in some white wine sauce is one of the classic ways to do it and I’m sure you can find dozens, if not hundreds, of variations of this dish on-line. The concept is a simple one, and we made best with ingredients at hand:

  • 1,5 kg of whole mussels, 
  • 1 medium onion, 
  • 3-4 garlic cloves, 
  • some nice dry white wine, 
  • coriander, 
  • parsley, 
  • salt, pepper,
  • olive oil, 
  • cooking cream


  • First of all separate the leaves and stalks of your greens. The idea is to use the leaves, that are more tender in the end of the cooking process and the stalks from the beginning. 
  • Bind the stalks of coriander and parsley with some string in order to easily remove it later – you can also add some lemon thyme springs to the coriander and parsley stalks and create a very nice bouquet garni. 
  • Next, start  cooking the finely diced onion and garlic cloves in the hot oil, on medium heat, for 3 minutes, with the stalks in. 


  • Add the wine, about 100-150 ml, bring to a boil, kick the heat up and pop the mussels in. 
  • Cover the pan and let the clams open in the wine steam for 4-5 minutes- throw away any mussels that don’t open. 
  • Remove the top, add some cooking cream for color (about 50 ml) with the parsley and coriander leaves. 


Serve the mussels with some crunchy bread and the rest of your white wine.


Enjoy,

Sunday, February 23, 2014

Broccoli and Anchovies Tagliatelle | You've Got Meal!


This recipe is about using some of the most common items in your pantry, in order to create a super simple and easy to cook fresh pasta recipe that is sure to give you a lift after a hard day’s work or accompany a nice glass of Pinot Grigio for brunch.


The ingredients are: 

  • Tagliatelle, of course (home made from 200 grams of flour and 2 eggs, quantities that make enough for 3), 
  • 8-9 anchovies fillets, 
  • 4-5 cloves of garlic, 
  • 400 grams of broccoli florets, 
  • about 100 grams of red pepper (we used the Kapia for this because of the shape), 
  • 50 grams of capers, 
  • the juice from half a lemon, 
  • salt, pepper, chili flakes,
  • fennel leaves or parsley for garnish

We talked a lot about homemade pasta in past posts, and we most certainly hope that you guys give it a try because it’s definitely worth the extra effort. Bring a large pot of salted water to the boil; it should be big enough to give both the pasta and the broccoli room to boil. I suggest starting with the sauce (if you can call it that) after the water starts boiling as it takes very little time and you want the pasta done in time. So, in heavy base large frying pan, heat up some olive oil on medium heat and pop in the sliced peppers and anchovies, cook them until the fish dissolves in the hot oil, it will take about 3 minutes. Again, keep in mind that you need to synchronize your pasta with the anchovies very well. 


For the homemade tagliatelle the cooking time was about 5 minutes, so we added the pasta to the water at the same moment as we started cooking the fillets. So, next, add the garlic and capers in the oil and cook for 1 minute. At the same time pop the broccoli in the pasta water and cook the vegetable and the tagliatelle for 1 minute – you want to sync the capers&garlic with the broccoli. After that, use whatever kitchen tool you need to remove the broccoli and pasta and put them in the anchovy pan. Mix the ingredients well so the tagliatelle are covered by the anchovy flavored oil. Remove from heat and sprinkle the lemon juice on the whole thing, feel free to add more if you find it necessary. For garnish you can use some parsley leaves, but we went for some fennel.


Enjoy,

Tuesday, February 18, 2014

Chicory, Green Apple and Mozzarella Salad | You've Got Meal!

Simple and healthy croutons salad idea. A recipe using endives, apple and Mozzarella. Perfect lunch/light dinner salad or as a starter.


Can’t believe that it took us so long to actually make a post about this dish. We’ve been making it for the past couple of years and we got the recipe from either Jamie Oliver or Good Food, can’t quite remember who we have to give credit.


Nonetheless, it’s a great salad, full of crunch, flavor, and it’s so light that you can use it as a starter to a longer meal. 

You’ll need:
  • fresh mozzarella (for 2 generous portions we used 2 balls with roughly 150 grams each), 
  • 1 rather tart green apple (Granny Smith), 
  • 2 medium sized chicories (or endives, if you know them by that name), 
  • a couple of slices of bread, 
  • salt, pepper, 
  • olive oil, lemon juice. 


  1. Just roughly chop the endives – by the way, the salad looks better if you can find and use both red and yellow - tip types, and cube the bread. 
  2. Heat up some olive oil on medium high heat and stir-fry the chicories for 2-3 minutes, remove from the pan and set aside. 
  3. Next, in the same pan add the bread croutons, splash a small amount of olive oil on top and cook them until they are slightly crunchy and browned all sides.
  4.  Meanwhile, cut or break the cheese in any way you like, dice about 1 quarter of the apple per portion and add it to the mozzarella. 
  5. Make a vinaigrette of 1 part lemon juice/ 3 part olive oil, salt, pepper and pour it over the endives, apple and mozzarella. After that, pop in the croutons and mix well.


The next part of the recipe is optional, but we definitely recommended it: open your very well chilled bottle of Prosecco, pour yourself a tall glass of the bubbly and enjoy this great salad that will make you love it at first taste.


Cheers,

Saturday, February 15, 2014

Fish Roe Salad | You've Got Meal!


This has to be one of the best and easiest to make appetizers out there, but it can have an acquired taste for some people – you are eating raw fish eggs in the end. There are a lot of possibilities from which to choose when deciding what type of fish’s roe to use, and for the recipe we went for pike. In my book, pike roe is in the top half, alongside trout roe. I like the fact that it has a medium granulation and the texture is a lot smoother than other types of roe that you could use for salad, like carp or hering. I’m pretty sure this is a well known fact, but the roe you use in salads are not the fresh ones, they are preserved with salt and plenty of it, so keep that in mind.  


Ingredients: 

  • 50 grams of pike roe, 
  • vegetable oil (make sure you use a bland oil, without a very strong flavor), 
  • lemon juice, 
  • a small onion, 
  • soaked bread (optional). 


Making the salad is a very similar process to the way you make mayo, it’s about adding periodically small amounts of oil and incorporating it into the roe. You can either use a fork and work out in the kitchen using your hands to mix the salad, or plug in the hand mixer on a low speed, it’s up to you. 

For about 50 grams of the roe we used about 100 rams of sunflower oil. We like to start by just mixing the roe without any other ingredients, in order to break some of the eggs, but not all of them -  they give a nice, pearled look to the dish. The amount of lemon juice you add is up to you, same as the moment you add it to the salad (we do that at the end).


The idea behind the use of the soaked bread is to create volume and to cheat about the amount of salad you make. You need to soak the bread in water, drain really well and incorporate it in the salad so there aren’t any lumps (don’t use crust for this). Finely slice the onion and incorporate it in the salad. You can choose to grate it if you’re not going for the crunch factor, but make sure you drain the onion really well then.


So that’s it, easy fish roe salad. For me, this always reminds me of 2 things:  Mrs. G.'s mother, who makes some great hering roe salad, and the taverns in Greece, that served this as antipasti alongside some Retsina wine. So, what about you guys, any thoughts about the dish or recipe?


Enjoy,


Related Posts Plugin for WordPress, Blogger...