Pin It button on image hover
Showing posts with label lunch. Show all posts

Wednesday, April 9, 2014

Fried Fish with Blistered Broccoli and Yogurt Sauce | You've Got Meal!


This post is supposed to be about a simple healthy recipe. Actually, when I think about a whole healthy dish the first option is some fish (simply cooked), broccoli (I love it in any way) and a cold yogurt sauce (no cooking required).

So, "surprise, surprise" last week we did just that because I wanted something really light.


For the fish:

  • You will need fillets, so if you have a whole one, you need to try to fillet it.
  • We used zander fish, you can also use perch or other fish of your choice.
  • You will need to season the fish, just salt and pepper on both sides will be fine, we also added some chili flakes.
  • Pour 1 tbs oil in a pan and fry the fillets on both sides, until golden/ golden-brown 


As a side:
  • We have used broccoli like this in this dish.
  • Cut the broccoli into florets, keeping a long enough stalk for each floret.
  • Cut each one in half so you have a flat surface to place them in a skillet. 
  • Heat up some olive oil on high heat, put the veggie with the flat side down in there and cook until you get a brown color. 
  • Turn the broccoli on the other side and pop the pan in the oven for 10 minutes. 
  • When plating the broccoli, add a splash of lemon juice, some chili slices or flakes and garlic slices.


The sauce is super simple, one you can use every time you have no idea what sauce to cook, if you run out of time or you you just need some freshness to your dish.
  • Mix in some yogurt with lemon juice.
  • To spice things up, add one crushed garlic clove, some paprika, pepper and dried oregano.
  • Being so light, this works best with fish and salads.


Enjoy,

Tuesday, April 1, 2014

Chicken and Avocado Wrap | You've Got Meal!


The previous post was all about making the most out of chicken leftovers. A salad is always a great way to use them, but let's not forget about the wrap. Probably my favorite choice for lunches at the office. Just like in a salad, you can incorporate a lot of healthy options in a wrap, but also add lots of flavor.

We used the rest of the roasted chicken we talked about and add one by one:
  • half of avocado (mashed with a fork)
  • some fresh red onion rings
  • some hot pepper slices
  • some thin slices of tomatoes
  • cress leaves
  • yogurt based dressing
For the yogurt dressing I used:
  • 150 ml yogurt
  • the juice from 1/2 lemon
  • finely chopped parsley leaves
  • 1 crushed garlic clove (optional)


Adding the avocado and cress leaves and using yogurt instead of mayonnaise is a great healthy choice and I can guarantee you will not lose taste and flavor.

Enjoy,

Saturday, March 22, 2014

Roast Chicken Salad | You've Got Meal!


This week we had a great organic chicken to cook and for such a beauty we had to make a roast,a simple, full of flavor whole chicken roast. There is only the two of us in this household, so we can't be done with a whole roasted chicken in one dinner, so the next day we had to use the leftovers in a fresh and healthy salad.


This is also a great way to take some of the previous evening dinner at the office for lunch. Plus, it happens to all of us, once the spring arrives we just want to make the most of those beautiful fresh vegetables.


You will need:

  • chicken leftovers (for 2 portions we had half of the breast and a thigh)
  • 2  handfuls of cress
  • about 6-8 radishes
  • 6-8 cherry tomatoes
  • a handful of pomegranate seeds
  • 1 medium red onion


For the dressing:

  • 150 g yogurt
  • the juice from 1/2 lemon
  • 1 crushed garlic clove
  • fresh coriander leaves
  • salt and pepper


Wash the cress leaves thoroughly, place them in a salad bowl with the chicken. We cut the chicken pieces in big cubes. Add the tomatoes, halved and the radishes cut in quarters. Cut the red onion in thin rings, add it to the bowl, then sprinkle the pomegranate seeds on top.

For the dressing, crush the garlic, add it to the yogurt, pour the lemon juice over them and season with salt and pepper. Add the chopped coriander and mix well. 

Pour the dressing over the salad and you are done! It would be great if you would comment below telling us how do you use your weekend roast leftovers.

XO XO,

Sunday, March 9, 2014

Duck Breast with Fennel Sauce and Oyster Mushrooms | You've Got Meal!


It’s duck season in the Youvegotmeal! kitchen, so it’s only natural that we had to cook a duck breast recipe. We had a whole duck that we portioned  into different cuts for different dishes, keeping the legs and the wings for some “confit de canard” and the breast for this recipe. You might recognize the last part of the title- the oyster mushrooms from a previous post. Frying them in tempura batter was a great side-dish for the meat. 


Ingredients: 
  • 2 duck breasts, about 200 grams each, 
  • 1 medium fennel bulb, 
  • 400 ml of coconut milk, 
  • 250 grams of oyster mushrooms, 
  • tempura batter, 
  • cloves, 
  • ground cardamom, 
  • salt, pepper, 
  • soy sauce, 
  • sugar, 
  • chili, 
  • fresh coriander leaves.


A couple of notes about the meat. We had a free-range duck (can I say that? Is it a thing?), meaning that the layer of fat that covered the meat was a bit thicker than what you would normally get. That’s an important thing to take into consideration because you want that fat rendered and, also, it affects the whole cooking time of the breast. Before actually cooking scar the breast on the skin with a sharp knife, careful not to reach the meat- this will help the fat reduce and give a you a nice look on the breast. Also, rub the duck meat with salt, pepper and ground cardamom.

 We started with the fennel sauce for this dish, the only reason being is that it took the most time. In a tall sauce pan, pop in the coconut milk, the finely sliced fennel, 1 tbs. of soy sauce, 1 tsp. of chili flakes or half of a fresh, medium hot chili, finely diced, 2-3 cloves, the sugar. Boil it down on until the fennel is soft enough to be pushed through a sieve into a sauce – 15-20 minutes.


  1. For the meat, use a heavy base pan, put the meat skin side down in it and place it on the stove on medium heat. 
2.  We cooked from a cold pan to give the fat enough time to slowly melt and not just burn. 
3.  Cook the breast skin side down for around 10-11 minutes, turn and cook for another 2 minutes. 
4.  Remove from the pan and let the meat rest for 5-7 minutes on a warm plate.


Plate the meat, the mushrooms and the sauce, and sprinkle some chopped coriander leaves on top.

Enjoy,


Sunday, February 23, 2014

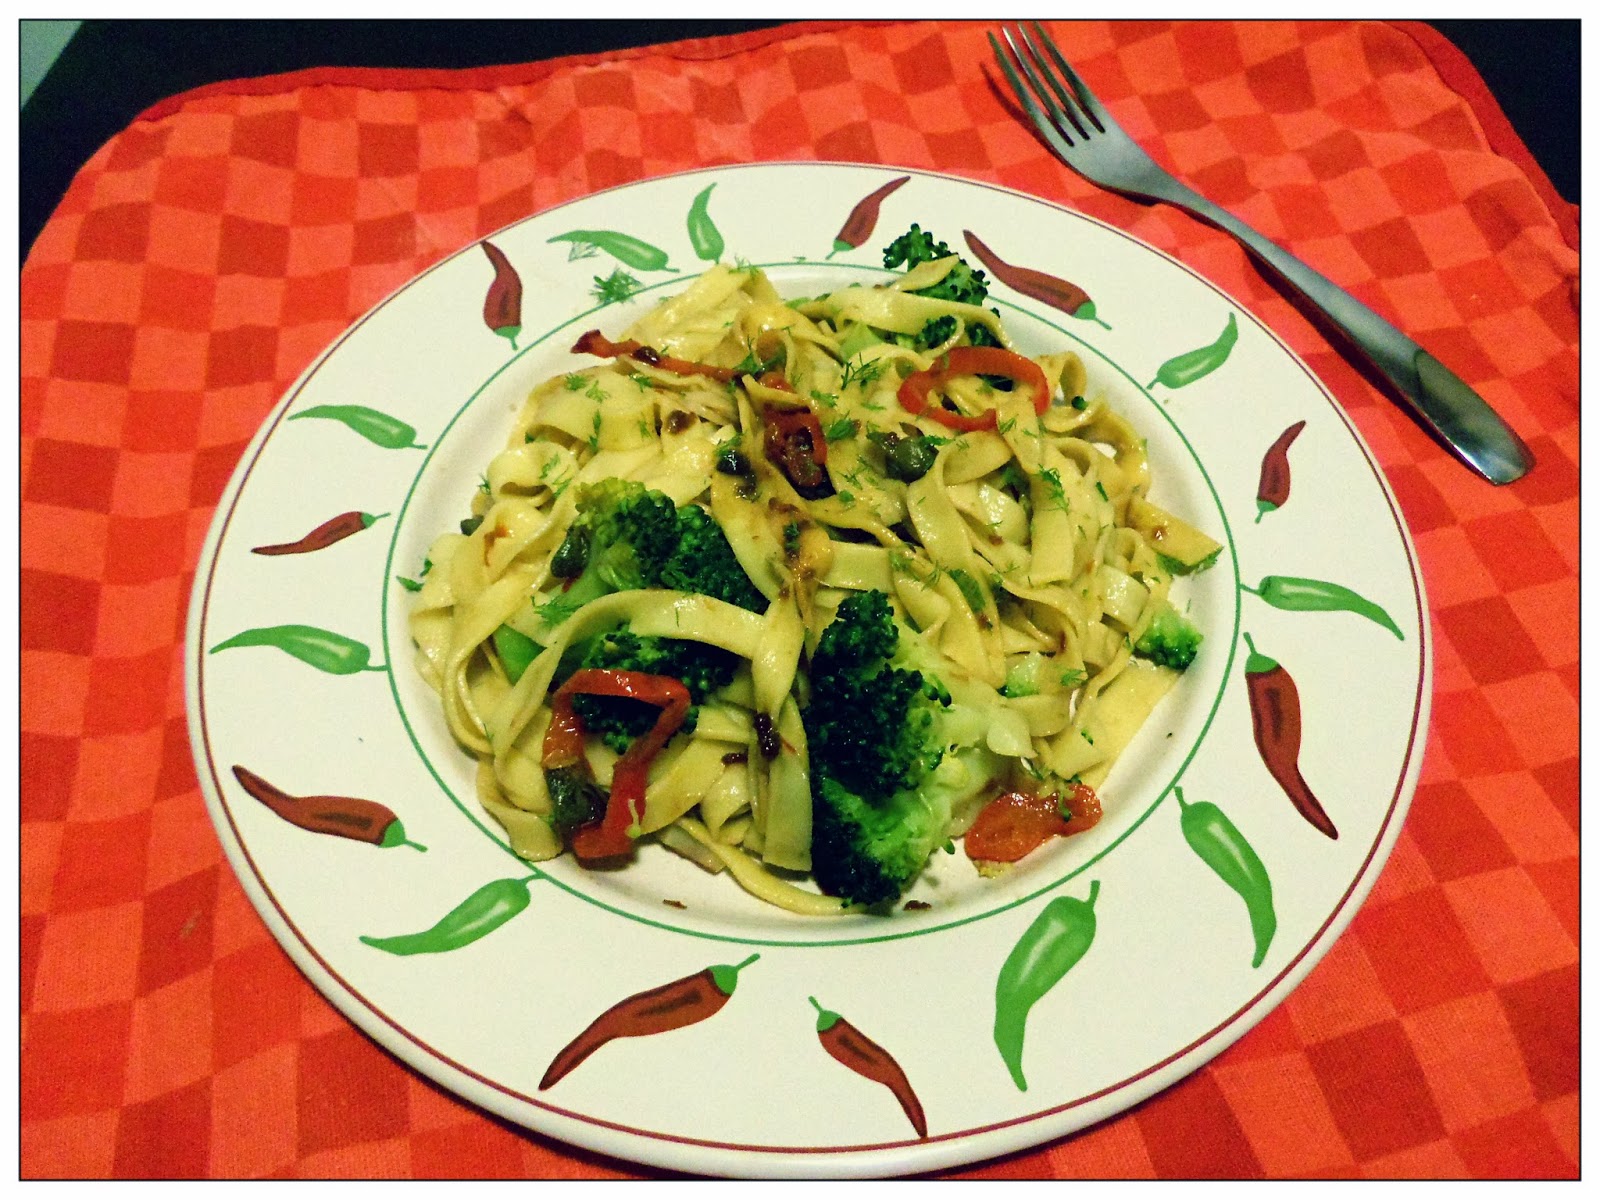
Broccoli and Anchovies Tagliatelle | You've Got Meal!


This recipe is about using some of the most common items in your pantry, in order to create a super simple and easy to cook fresh pasta recipe that is sure to give you a lift after a hard day’s work or accompany a nice glass of Pinot Grigio for brunch.


The ingredients are: 

  • Tagliatelle, of course (home made from 200 grams of flour and 2 eggs, quantities that make enough for 3), 
  • 8-9 anchovies fillets, 
  • 4-5 cloves of garlic, 
  • 400 grams of broccoli florets, 
  • about 100 grams of red pepper (we used the Kapia for this because of the shape), 
  • 50 grams of capers, 
  • the juice from half a lemon, 
  • salt, pepper, chili flakes,
  • fennel leaves or parsley for garnish

We talked a lot about homemade pasta in past posts, and we most certainly hope that you guys give it a try because it’s definitely worth the extra effort. Bring a large pot of salted water to the boil; it should be big enough to give both the pasta and the broccoli room to boil. I suggest starting with the sauce (if you can call it that) after the water starts boiling as it takes very little time and you want the pasta done in time. So, in heavy base large frying pan, heat up some olive oil on medium heat and pop in the sliced peppers and anchovies, cook them until the fish dissolves in the hot oil, it will take about 3 minutes. Again, keep in mind that you need to synchronize your pasta with the anchovies very well. 


For the homemade tagliatelle the cooking time was about 5 minutes, so we added the pasta to the water at the same moment as we started cooking the fillets. So, next, add the garlic and capers in the oil and cook for 1 minute. At the same time pop the broccoli in the pasta water and cook the vegetable and the tagliatelle for 1 minute – you want to sync the capers&garlic with the broccoli. After that, use whatever kitchen tool you need to remove the broccoli and pasta and put them in the anchovy pan. Mix the ingredients well so the tagliatelle are covered by the anchovy flavored oil. Remove from heat and sprinkle the lemon juice on the whole thing, feel free to add more if you find it necessary. For garnish you can use some parsley leaves, but we went for some fennel.


Enjoy,

Friday, February 14, 2014

Sticky Ribs with Goose Fat Fries | You've Got Meal!


Ah, sticky ribs, the reason God gave you fingers. And there you go. Enjoy! Just kidding, Mrs. G says I have to give you guys the full details of the recipe. Not that I wouldn’t have done that, but I think I mentioned before I’m kind of lazy. 


The main idea of the whole meal is to enjoy a Friday night sticky, greasy, delicious dinner made of some oven baked ribs, some potatoes cooked in goose fat, everything balanced by some crunchy and tangy salad leaves with beets and pumpkin seeds. 

The ingredients we used: 
  • 3 single ribs, about 100 grams each (makes it easier to cook), 
  • some potatoes, preferably new, 
  • salt, pepper, 
  • thyme, oregano, smoked paprika, 
  • ketchup. 


For  the salad we had some crunchy iceberg leaves, with some radicchio rosso, an oven cooked small beet, cut into sticks, pumpkin kernels, salt, pepper, olive oil, lemon juice, red wine vinegar and a tsp. of some not very strong mustard.


I find that cooking ribs has a positive effect on my mood, maybe because of the delicious smell of grease and condiments melting away into something great. Despite that, it has a definite negative impact on the look of the kitchen, especially if you pan sear it. So, I like to slow cook the ribs in the oven, in an covered tray until the fat melts and the meat gets nice and tasty.


  1. Start of by rubbing the meat with the dry condiments and some salt. 
  2. For the next step, you can choose to use a tray with a grill on top, so the fat will melt and fall into that, or you can place the ribs straight in an oven tin, in which case the fat will melt and the ribs will also cook in it. 
  3. We went for the second, mainly because I find that cooking meat in fat of any kind makes it really tender and elevates the taste. 
  4. So, we covered the tray with some tin foil, and cooked the meat for 80 minutes on a medium low heat, turning the ribs half-way and covering back the tray with tin foil. 
  5. In the last 10 minutes, remove the tin foil and brush the ribs with some ketchup or barbeque sauce. Turn up the heat and cook in order to create a glaze.


Meanwhile, you can cook the spuds by, you’ve guessed it, frying them in goose fat. Start of by cooking them on high heat for a couple of minutes, in order to get some color, then reduce the heat to medium and cook for around 15-20 minutes, until you get a golden brown color on all sides.


The salad helps the meat and the potatoes tone down on the fatty note. Just make a vinaigrette with the juice of half a lemon, 3 tbs. of olive oil, 1 tbs. of red wine vinegar, 1 tsp. of mustard, salt and pepper. Mix the result with the salad leaves of your choice – choose some crunchy ones, the beet and pumpkin seeds.
This meal, that you’ve just got – pun intended, screams for some Cabernet or a nice, red ale, so take your pick with the alcohol.  A full, heart meal that can get you ready for a lazy weekend at home, perhaps in the company of some chicken wings? Because that’s the second reason God gave you fingers.


Guys, we try and give you in every recipe we post here our honest and explicit experience with food, and any feed-back or tips for further improving any dish is well appreciated. So feel free to comment, criticize or like any post here, can’t wait to be hearing from you!


Enjoy,


Monday, February 3, 2014

Chicken and Gorgonzola Roulade | You've Got Meal!


For some strange reason, people tend to appreciate meat roulades at a dinner table. Apparently, there seems to be some sort of fear of making such a dish or trying it. I remember my mom cooking meat rolls only a couple of times and on special occasions. And I remember my dad saying we have to say it was good. Don’t know why he said that, the dish was great. Is that ok, Dad? You’re now safe if she reads this post.


For me, making a roulade is a more interesting way of using a rather dull meat like chicken breast. Combine that with a couple of savory ingredients like Gorgonzola cheese, artichokes, cipolline borettane and the all-mighty bacon and you can elevate the pour poultry piece. 


Let’s talk ingredients: 
  • a couple of pieces of chicken breast meat, 
  • sweet gorgonzola, 
  • artichoke hearts, 
  • cipolline borettane (you can caramelize some baby onions if you don’t have them around), 
  • thin bacon strips for covering the rolls, 
  • salt, pepper, chili flakes. 


You can use a whole breast, but be careful how you cut it. The idea is to get a couple of pieces of meat that you can tenderize with a meat hammer (or a rolling pin) and bring to a shape works for the roulade. We got 4 “sheets” of chicken meat from 1 breast, enough for some medium rolls.

Place the flattened meat on the work surface and season it with salt, pepper and chili flakes on the inside. Put a small amount of cheese in the center and a couple of artichoke hearts and roll the meat. Don’t overdo it with the cheese, too much of it will melt and burn in the pan/oven. 


Use the bacon strips to cover the rolls, make sure they’re nice and covered all over the place -  it will help you keep the cheese in and not burn. We also made a roll using the same amount of cheese and some cipolline borettane instead of the artichokes – asparagus will also work really nice. Cook the roulade in the hot pan, medium high heat, in a couple of tbs. of olive oil, for 2-3 minutes, then straight in the preheated oven,190 Celsius for 15-20 minutes.


As a side dish, we tried to mix things up with some Jerusalem artichokes. So, we got a couple of nice potatoes, pop them in the oven to bake, alongside some Jerusalem artichokes and garlic, none of those peeled, only cleaned. After the potatoes are done, remove 1 quarter of the spud and use a spoon to remove the inside of the remaining potato. Use a knife or a spoon to remove the Jerusalem artichoke’s white insides, and mix that well with some Gorgonzola, salt, pepper and the potato you pulled out. Use the mixture to fill in the spud, sprinkle some hot paprika on top. Serve the potato with the chicken and some valerian salad sprinkled with some lemon juice and olive juice. As an added bonus, grab a chilled bottle of Sauvignon Blanc and enjoy a light, simple dinner.


Enjoy,

Sunday, January 26, 2014

Cod, Couscous and Zucchini | You've Got Meal!


Let me assure you right from the beginning that there is more to this dish than an enumeration of the ingredients listed above. The fish works great with the fluffy, flavored couscous, the mellow zucchinis elevate the combo and a harissa-yoghurt sauce brings everything together. 

So let’s talk ingredients: 
  • a couple pieces of cod (we used some frozen ones), 
  • about 150 grams of couscous,  
  • sun dried tomatoes, 
  • spring onions, 
  • 2-3 garlic cloves, 
  • 2 medium zucchinis, 
  • 1 lemon, 
  • Greek yogurt,
  • Harissa sauce.


  1. Start of by cooking the zucchini: cut them in medium sized chunks, give them a good splash of olive oil, a pinch of salt and pepper and place them in an oven proof pan, with 2 halves of a lemon. Cook in the preheated oven, medium-high heat for around 20 minutes. Taste from time to time, just to make sure you don’t overcook the vegetables.
  2. Next, the couscous. I think that the only thing simpler than cooking couscous is eating cereals for breakfast. Put the couscous in a bowl, pour hot water over it until in covers it for about 1 cm. Use some cling film to cover the bowl and wait until all the liquid is absorbed. Use a fork to fluff the couscous. Mix in some finely chopped sun dried tomatoes with a couple tbs. of their oil, crushed garlic and spring onions.
  3. You can cook the cod any way you feel like it: grilled, seared, in the oven. We rolled the cod pieces in some cornmeal crust and then we fried the fish in some olive oil until it got a beautiful golden crust.
  4. Plate everything, including  a healthy amount of yoghurt and Harissa sauce next to the fish and veggies. Grab your favorite salad mix (indulge yourself with that little cheat) and place a nice hand of the crunchy leaves, sprinkle a splash of the baked lemon juice on top. Be careful though, the juice gets a fair amount of bitterness from the zest when cooked, so it may be a little bit overwhelming. 


Trust, you can’t go wrong with this combo, it has everything you need – fish, veggies, couscous and a hell of a kick from the baked lemon juice. You can choose to replace the fish with another type, fresh herring or mackerel. Also, if you can’t get Harrisa sauce, just make your own, boil down some passata juice mixed with tomato concentrate, hot pepper jam, cumin, all spice, sugar, a touch of rose water and saffron. Or whatever  condiments you feel like having in your sauce – it’s just that easy.

Enjoy,

Related Posts Plugin for WordPress, Blogger...