Pin It button on image hover

Monday, April 29, 2013

Fast Breakfast- Avocado Toast


This is not a recipe post, obviously avocado toast is the easiest thing to do, but it is so delicious and addictive that even if it needed more effort and time it would be worth it.

Lately, it has been the breakfast I think about when I wake up. What can I say? Avocado toast is the new bread and jam. Just toast some slices of your favourite bread.  Cut the avocado in half, remove the pit and with a spoon betwen the skin and the pulp remove the skin. You can smash it and put it on the toast like a spread, you can cut it in slices or chunks. As you can see we chose both, chunky slices. :)

Drizzle some olive oil on top, some sea salt and some pepper optional. Depending on your taste , add some fresh lemon juice.


Have a great day!

Sunday, April 28, 2013

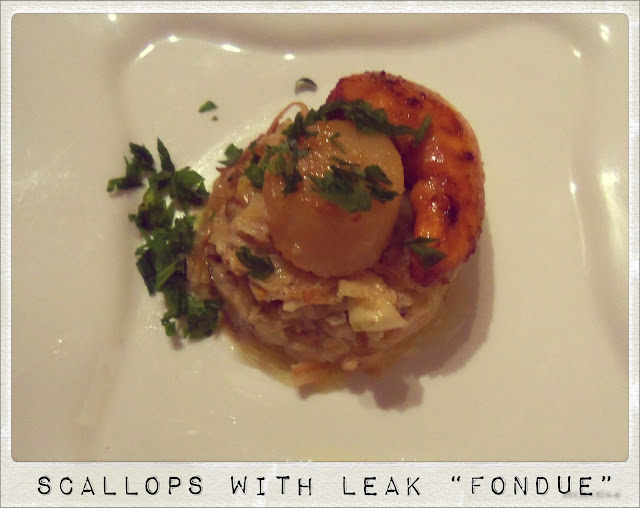
Scallops with Leak “Fondue” (Saint-Jacques aux Poireaux )


This was out first time cooking these beautiful shells and we tried to use a simple, elegant recipe, that really underlined the texture and refinement of the scallops. For this dish we had shells that were whole, meaning we used both the scallop (the muscle of the mollusk) and the coral (you can choose to cook only the scallop itself ), and this is important mentioning as the two have different  cooking times. 


So, the ingredients:
-about  14 scallop+coral combo
- 500 grams of leak, finely chopped (I used both the white and the green part of the leak, if you don’t want to see any green in the dish, use only the whites)
-120 grams butter
- 2 tbs cream
- 1-2 tbs finely chopped parsley
- 2 garlic cloves
- 1tbs olive oil


Start by washing the mollusks and separating the scallop from the coral (be careful as you do this, the meat tends to brake easily of the coral). In a heavy base pot heat up 60 grams of butter on a low heat, add the leak, stir, put a lid on, and let it break down for about 20 minutes. After that, the leak should have an almost creamy consistency, at which point add salt, pepper, the cream and the finely cut garlic, mix on low heat without a lid for 3 minutes, and you’re done with the vegetable.

We also tried a Tunisian wine for the first time
Meanwhile, prepare the meat. Heat up the remaining butter with the oil, and fry (on medium high heat) the scallops for 3-4 minutes, turning them half-way, and the coral for about 1-1,5 minutes, flipping them also. Make sure you sprinkle some parsley on the dish, also some lemon juice brings a nice kick to the scallops.


Enjoy!

Friday, April 26, 2013

Prosciutto Wrapped Beef Tenderloin, Mushroom and Spinach Sauté and Polenta


This was, without the shadow of a doubt, one of the best dishes I tried in our kitchen. The ingredients themselves were great and the combo proved to be top notch quality. So, I’m going to take it step by step, and explain every dish separately.


The meat: for this dish we had a nice piece of beef tenderloin, about 400-450 grams, that we cut in to 3 equal parts. The advantage of using the loin is the fact that the mat has a round shape and it’s easier to wrap the prosciutto around it. Besides the beef, I had 6 slices of the prosciutto, 2 tbs of finely chopped sage and  a couple of tbs of olive oil. Wrap 2 prosciutto strips around the length of each beef portion, leaving the sections clear (you can use string to keep the met on, I didn’t find it necessary).  Rub some sage on the parts that are not covered by the ham.  Next, heat up the olive oil in a oven-proof pan, and, when it’s nice and hot cook on all sides for about 1 minute each. After that, transfer the pan to a preheated oven (180 Celsius) for around 15 minutes or how long you need to cook the meat the way you like it. After that, just let it sit for a couple of minutes before  cutting it an transferring to a plate.


Mushroom and Spinach Sauté : Meanwhile, heat up some oil in a pan, and add 1 medium onion and 1 clove garlic, finely chopped, and about 500 grams of button mushrooms, cleaned and cut into quarters. Saute this over medium high heat until the mushrooms are soft, add about 200 grams of spinach leaves, salt, pepper, and cook for another 2 minutes, then remove from the stove.


For the polenta, put to boil in a tall, heavy base pan, 500 ml water, a pinch of salt, and a sprinkle of cornmeal. When this mix starts boiling, slowly add more cornmeal, mixing constantly. When it gets hard to mix, stop adding the flour, but keep on stirring the polenta. This whole operation should be done in 12-15 minutes.  Remove the pan form the heat, add 50 grams of butter and about 75 grams of grated parmigiano and mix it all together.


So, these are the 3 parts of the recipe, actually pretty easy to cook at the same time. You can also make a very easy reduction, like the one here


Enjoy!


Thursday, April 25, 2013

Jam Cupcakes with Chocolate Frosting


I am sorry we have been M.I.A. from the blog lately, but we actually didn't do much cooking and this blog is about that basically. We had food from our parents, we ate out or just grabbed a salad in a hurry.


A couple of days ago I bought a new muffin tin and I had to try it. We lost out muffin tin when we moved, I have no idea how that could have happen, but I was excited to have one again. As a first bake, I chose the Martha Stewart's recipe for Jam Cupcakes. The recipe is on the site.

In case you are wondering, the muffin cup liners are from IKEA. I found them a little big for the quantities in the recipes. As you can see, my oven still cooks uneven, but all was good. Just to be on the safe side I put a tray with water in the oven, underneath the muffin tin, so that they stay fluffy, which they did.


I baked them for about 25 minutes. I let them cool, then made a little hole in the middle and added the jam. I used cranberry jam and fig jam. The jam inside is a nice surprise, but if you choose to keep the chocolate frosting, don't put too much as the frosting is kinda heavy. The frosting is a butter one, as I said, a bit heavy for my taste, but it works with the delicate muffins.


Overall, these were good, for sure I would try the recipe again, even without any frosting. It is a simple one, no special cooking skills required. The muffins were super good, so fluffy and soft, the jam is the nice touch and the frosting is perfect for chocolate lovers.


Enjoy!

Monday, April 22, 2013

Morning Salad with Eggs and Bacon


Ingredients for 2 large servings:

200g baby spinach
200g valerian salad
4 thin slices of bacon
4 slices of your favourite bread
4 (soft) boiled eggs
salt and pepper
parmesan
oil and vinegar for the dressing


Fry the bacon without any oil until it gets crispy. Remove it from the pan. Add to the pan 3 tbsp oil and fry the bread, previously cut in cubes. Mix the oil, vinegar, salt and pepper and add the dressing to the leaves. Add the crutons, bacon, eggs and grate some parmesan on top.

Of course you can use iceberg, rucola or any kind of salad you prefer, just keep it green.
That is it. Now you can start your day fresh! Enjoy.

Sunday, April 21, 2013

Garlic and Tomato Sauce Chicken/ Ostropel


Ingredients: 

2 whole chicken legs, and, optional some breast meat
1 tsp chilli
1tsp smoked paprika
salt and pepper
2 tbs dark sugar
2 cans of plum tomatoes
Garlic - insert amount here (we used both garlic and spring garlic)
Parsley


The whole idea behind this dish is to use and combine the sweetness of the tomatoes with the caramelised taste of cooked garlic. The amount of garlic used is up to you, in our kitchen this dish is called garlic extravaganza, so that should give you an idea of how much we use (to be precise, 3 garlic heads).


The recipe is a super easy one, a rather oldschool dish made by our grandparents, who used very ripe tomatoes to give an unique taste (the season being what it is, we substituted those with canned).  First, rub the meat with salt, pepper, chilli and paprika. Heat up about 2-3 tbs of vegetable oil, put your chicken legs in and cook them until they start getting golden brown on all sides (by they way, we almost burned the meat when watching TV-damn you, Doctor Who! ). If u want to use breast meat, make sure you start cooking it a bit later, as you don't want to burn it.  Add the sugar and cook until caramelized ( about 3-4 minutes). Add the canned tomatoes, lower the fire to a medium, cover and let it cook for about 15 minutes. After that add the garlic; the faster you throw in the garlic and the more it cooks, the sweeter and less pungent the flavour will be (kinds like a garlic confit). If the liquid dropped too much, just add chicken stock. When the meat is done (it should come of the bone easily), turn the heat off and add the chopped parsley.  


Enjoy!


Thursday, April 18, 2013

Testing the Best Banana Bread Recipe


 I really like having homemade sweets and desserts in the house every week, but unfortunately, my oven is not the best one. We are stuck with an old one that was in the house when we bought the apartment. It is fine for many things like roasting, but when it comes to baked goods and pastry in tends to burn in the back of the oven.

With that in mind (kind of dissapointing, I know) I have tried lately to find or come up with simple recipes or ones that don't use the oven at all. For a long time I have been thinking of making Banana Bread. I am not American so it is not unusual that I never tried it, but it also means that I didn't have a family recipe and I didn't know what to expect.

So, I searched the Internet trying to find the best recipe from the thoundsands that are online. This one was very much praised so I decided to give it a try. It is the America's Test Kitchen show recipe and it goes like this:

Mix the following dry ingredients:

2 cups of flour
3/4 cups of sugar
3/4 tsp baking soda
1/2 tsp salt
1 1/4 cup walnuts, chopped and roasted

In another bowl mix the wet ones:

3 ripe bananas smashed with a fork
1/4 cup buttermilk
2 large eggs lightly beaten
6 tablespoons melted and cooled butter
1 tsp vanilla

Then, incorporate de wet ingredients in the dry ones slowly.Try not to smash the banana to much, the flavour is better when you find some bigger chunks.


Butter and then flour a bread tin. I read that it was really important to coat the tin really well in flour so that the bread would climb the sides of the tin.


After 55 minutes in the oven, I tested it with a toothpick, I let it for 5 minutes to cool in the tin then for another 10 to cool on a rack.


I must say, I liked the recipe, the bread is nice and moist on the inside, but it has a really nice crust on top. I can pretty much say I will try it again.


Enjoy!

Wednesday, April 17, 2013

Simple Breakfast- Spicy Scrambled Eggs

Good morning!

Sometimes, for a pick-me-up you need a rich egg breakfast.
My choice today: eggs + spring onion + hot pepper + salt + pepper. All scrambled and delicious.


Have a great day!

Monday, April 15, 2013

Chicken Noodles Stir Fry - Simple Chinese Recipe

Today we will share with you what has become a tradition in our home. Honestly, if you make sure you always have the ingredients on hand, it is easier and quicker than take out being delivered to you.

Not to mention is has the take-out smell and flavor, but you can control what you put in it.

Rice or bean thread noodles  (the thin type)
300 g chicken breast
1 carrot
1 bell pepper
1 medium onion
5 tbs soy sauce
1 tbs fish sauce
2 tbs brown sugar

1 tsp 5 spices condiment


Cut the vegetables in long slices or however you prefer them. You can cut the chicken in either fine, thin, long strips, or in small cubes, either way make sure you cut it pretty small so it will cook fast.

In a wok, heat up some oil (sesame, peanut, or just vegetable, don't bother with olive oil), about 2 tbs, then stir fry the vegetables for around 3 minutes. After that, add the meat with the sugar and 5 spice, and brown the chicken for about another 3-4 minutes. Make sure you don't overcook the veggies, they have to be nice and crunchy (if i were Italian i would say al dente, so whatever). Add the fish and soy sauce, mix it up all together.

Now for the noodles: you need about 60-90 seconds to cook them (depending on the type and thickness of the pasta, we used and loved rice or bean thread), and about the same amount of time with the vegetables and meat combo. When you put the noodles in the wok, add another tbs of soy sauce (or don't, it's all about taste). Mix it all together, grab your chopsticks, and enjoy.  

Optional: if you wanna make things hot in this motha-dish, add a nice hot smoky red chilli with the vegetables. 

Sunday, April 14, 2013

Tin Foil Thai Trout- Simple Recipe


Last night we tried one of Lorraine Pascal's recipes, a sort of Thai recipe for super easy and time-saving trout cooked in tin foil, in the oven- Tin foil Thai Trout- try to say that fast! :)

You will need:

4 fish fillets (we used trout)
1 carrot
1 bunch of spring onions
1 celery stick
1 bunch of coriander
3 cloves of garlic
1 thumb sized piece of ginger
1 chilli
2 limes
soy sauce
oil (the original recipe calls for sesame oil)
salt
pepper


First, prepare the fish if necessary.

Then, the only thing that it will take some time is to cut the vegetables. You have to cut the ginger, carrot, chilli, spring onions and celery into long sticks, the garlic in fine slices.  In the oven we will use only the stalks from the coriander, the leaves are to be used when served.


Cut squares of tin foil and divide the vegetables in 4, for each fillet. Arrange the fish in the middle, then add some carrot sticks, onion, celery, ginger, garlic, chilli and coriander stalks. Season with salt, pepper and a tablespoon of oil, one of soy sauce and  some lime juice.

Wrap the fillets in foil, seal it well but be sure there is room for air to circulate, because the point is that the fish should be steamed.


Cook it for 12 minutes in the oven, I just placed each package on the oven grill, but you can also put it on a baking tray. The 12 minutes worked perfectly for us, the fish was cooked to perfection.

Just serve it in the tin foil and enjoy the beautiful sauce that surrounds the fish. Sprinkle some coriander leaves on top and some lime. We served it with some plain bean thread noodles, the transparent kind of Chinese vermicelli.


Enjoy!

Friday, April 12, 2013

Simple Recipe- Gnocchi with Sage and Butter Sauce


As promised, here is how we served the gnocchi from the previous post.

Being the first time we made gnocchi, we decided to go with a simple sauce, that will not overshadow the fruit of our labour, but will complement these amazing Italian dumplings perfectly.


This whole sauce takes about 3 minutes so time your cooking very carefully and coordinate it with the boiling gnocchi. In a large pan we melted about 50g of butter and when it started to bubble we added the chopped sage and after 1 minute we added 2 cloves of garlic, also chopped.  After 2 minutes, add the pasta and toss it around in the sauce, making sure it is well coated.


Cook it for another 2 minutes, after which it should have a light brown colour. Serve it with grated parmesan.

For a twist, we also added to the recipe  after putting the gnocchi in the butter some canned salsify (oyster plant). You just need to heat it up, there is no cooking neccesary with the canned type. It brings a nice touch to the dish with its slightly tangy taste and it is fleshy enough to subtitute meat.

I am impressed by this Italian classic and how the gnocchi absorbs the flavour. Actually, the little line marks you make with a special tool or with the fork have this purpose, to hold the flavours better. I have been wanting to try and make the homemade version for some time now. I remember the first time I had this kind of pasta, I was in Bregenz, Austria, and an Italian restaurant. I wanted to try the gnocchi so I asked the waiter what it was. I will never forget the surprised look on his face and his answer : Gnocchi is Gnocchi! And, now, I have to say, he was right, you can't really find a comparison.

I know the butter sauce is not actually a staple of Italian Cuisine, but it works perfectly with the gnocchi and it couldn't be easier.


Hope you try it and enjoy it like we did.

Thursday, April 11, 2013

Homemade Gnocchi from Scratch- 1st Attempt


Last night we made (or, at least tried to) gnocchi. The recipe is a rather easy one, and the resulting dough is very easy to knead. So, we used 1 cup of baked potatoes, that we put through a fine strainer (you can use a rice mill if you have one, the strainer part was the hardest one of the recipe), 2 cups of flour and 1egg yolk.


Mix everything together, either with your hand or with a cake spatula, so you don't get yourself dirty. The dough is a very soft one, knead it on a highly floured working board because, as you work it, you will need to incorporate more flour into it.


We stopped kneading when the dough wasn't sticking at all when worked through (it incorporated enough flour), but still had a very nice and fluffy consistency. It's not like the pasta dough, you will not get the same elastic, harder type. The resulting quantity of dough we split into 4 pieces, and rolled each one until they were about 2-3 cm thick. After that we cut the rolls in 1-2 cm pieces (you can cut into bigger pieces but we liked the smaller version better). After this we wanted to give the gnocchi its trademark stripe. You can do that by either rolling the gnocchi on the back of a fork, or just lightly pressing the fork on the gnocchi.


 It taked very little time to boil the gnocchi, about 3-4 minutes, depending on size, you need to pull them out when they start floating. So this was our attempt, hope it helps, we really liked the results and will be doing it again for sure. And next time we'll also post a very nice, easy, simple and oh so delicious sauce (also butter-licious, small spoiler there).


See you next time!
Related Posts Plugin for WordPress, Blogger...