Pin It button on image hover
Showing posts with label sauce. Show all posts

Sunday, January 5, 2014

Beef and Root Vegetables Salad (Russian Salad Variation) | You've Got Meal!


This dish is a version of a mayonnaise-folded salad that is extremely popular in Eastern-Europe and in post-soviet countries. It is usually prepared during the winter, for special occasions like Christmas Eve or New Year's Eve. It is  a great recipe for winter because it uses meat, potatoes, root vegetables and pickles, so all ingredients were and are easy to find during winter. This version is most similar to the Romanian version, that has a fancy, French name "salata de boeuf", although the inspiration is not French, but Russian, from Salad Olivier  or Russian Salad. As popular as it is, everybody seems to have their own version. Some use chicken breast, some beef, some don't even use meat, some add peas, some are totally against peas...Being such a simple salad, it is delicious in any way.


I think is that delicious because it has everything it needs: the meat, the neutral taste (potatoes), the sweet (carrots and parsnip) and the sour (pickled cucumbers). It can be useless to give exact measurements, it all comes down to preferences, but usually you will need relatively equal quantities for the four components above.  All that topped with delicious home made mayonnaise.

 Ingredients:

  • 400 g beef meat
  • 5 potatoes
  • 3 carrots
  • 1 parsnip
  • 4-5 pickled cucumbers
  • home made mayonnaise made from 1 yolk
  • salt


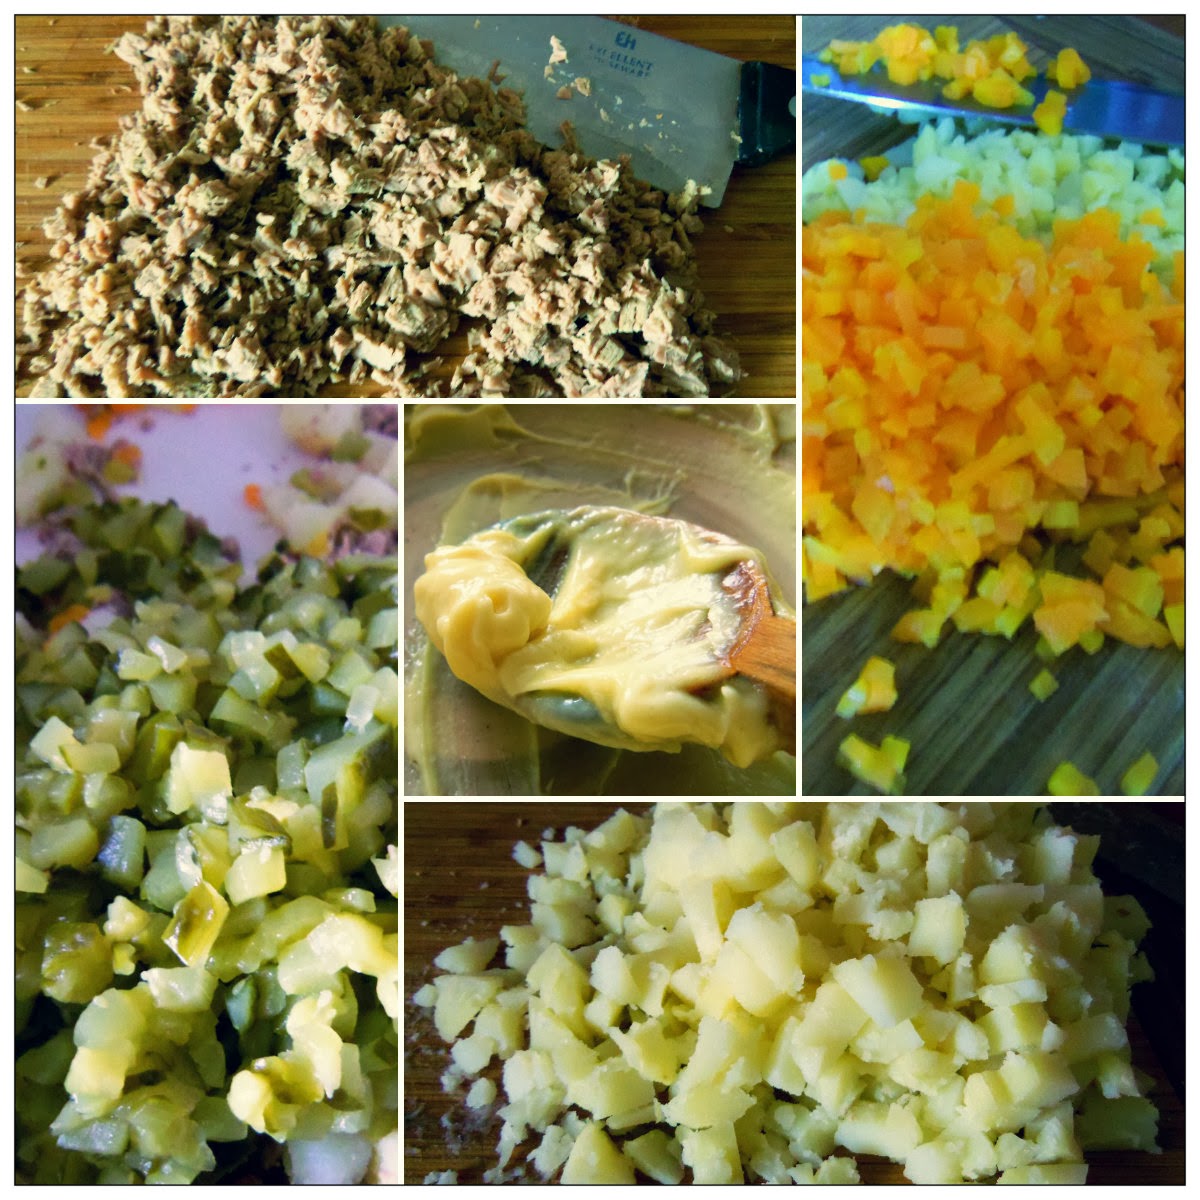
  1.  Boil the meat and the boiled vegetables separately. 
  2. Dice the meat and the vegetables. Dice small the pickled cucumbers and squeeze the pickles to remove some of their juice, or the salad will be too watery.
  3. In a bowl, place all the diced ingredients, add salt to taste and  mix them.
  4. Add mayonnaise to the diced ingredients and toss and mix well. Always taste, you might not need to add all the mayo.
  5. By now, you can traditionally place the salad in a pretty bowl and cover with another layer of mayonnaise (optional). It can also be decorated with hard-boiled eggs or vegetables.
  6. Decorated or not, it is delicious served chilled as a spread, as an appetizer on crusty bread or salad leaves, or even as a side dish for fried or grilled meats.


Enjoy,


Simple Homemade Mayonnaise- How to | You've Got Meal!


Ingredients:
  • 1 egg yolk
  • 1 tbsp mustard
  • 250 ml vegetable oil
  • about 1 tbsp lemon juice
  • salt to taste
Method:
  1. In a bowl, mix the egg yolk and salt with the mustard and stir it or whisk it  until well combined. Adding the mustard from the beginning prevents the mayo to split. Make sure the egg is room temperature, it is easier to work with it.
  2. Start adding drops of the oil and keep mixing. Add the oil slowly, that is really the only secret. 
  3. Once you have added have of the oil, the mayo should be thicker and you can add the rest of the oil faster, even in a slow, thin stream. Now the mayo should start changing its color and become really thick.
  4. Add the lemon juice, more salt if necessary, incorporate them and keep the mayonnaise in the fridge covered. Never let it sit to much at room temperature.
  5. If the mayonnaise is too thick, you can thin it with a little bit of water. If it is to thin, add some more oil and incorporate it as before.

Enjoy,


Saturday, October 26, 2013

Lumaconi alla Parmigiana- Oven-baked Vegetarian Pasta | You've Got Meal!

While we were grocery shopping we stumbled upon a great variety of pasta. Even though we like to make our pasta from scratch, sometimes is nice to come home in the evening and put together some pasta and other simple ingredients for a nice, under 30-minutes dinner.


We got some Pizzocheri pasta, that still wait patiently in the pantry, and a pack of Lumaconi. Lumaconi is a snail shell shaped type of pasta, that is quite thick and long, which makes them perfect for very al dente boiling and oven baking to finish the cooking.


I like my pasta dishes 2 ways, really light and simple or super cheesy, and I always thought that oven baked pasta is super filling. that is why I wanted to go for a meatless choice for Lumaconi. Eggplant or aubergine is a great choice for vegetarians, being high in fiber content it makes you feel full.


The usual layers needed for an oven baked pasta dish are the pasta, some sauce or filling and some other sauce or topping to seal everything. I chose not to fill the pasta to save time, but the flavor was not lost.

I started off by preparing the sauce:
  • 4 tbs olive oil
  • 4 cloves garlic finely chopped
  • small handful of olives, pits removed and cut in round slices
  • 1200 ml tomato passata/ pulp (of course you can make your own)
  • 1/2 tsp salt
  • Heat up the oil, add the garlic, then the olives, stir well.
  • Add the tomato paste and let the sauce thicken, stirring from time to time. I let it simmer for about 15 minutes with the lid on because it gets bubbly.

You will also need:
  • 1 small eggplant
  • 500 g dry Lumaconi pasta
  • 500 g mozzarella, cut into cubes
  • some basil leaves, depending on how much you like basil
  • 100-140 g Parmesan
  • some olive oil, to oil the baking tray
  • While the sauce simmers, cut the eggplant into slices and then into cubes, deep-fry it until it gets golden, then take it out on an absorbing paper towel.
  • Boil the Lumaconi really al dente.
  • Grate the Parmesan and prepare the basil leaves.

To arrange the ingredients in a tall baking tray:

  • Oil the baking tray bottom and sides with a soaked napkin.
  • Pour 3/4 of the sauce on the pasta and mix well, you can  always fill the shells with the sauce. Put aside the remaining sauce.
  • Start with a Lumaconi and sauce layer, then add half of the eggplant, half of the mozzarella, some basil leaves and half of the Parmesan.
  • Continue with the other Lumaconi layer, eggplant, mozzarella, basil, Parmesan.
  • Finish off with the remaining sauce.
  • Bake in the oven for 40 minutes, medium heat.

It really is a nice dish, is quite impressive and it is way more easy to make than it seems. We were really satisfied with the result and we hope you try it also. It is great served immediately, but in arder to set a little and have a nice and firm shape like in the first picture, let it acool for a bit.


Enjoy,

Wednesday, October 9, 2013

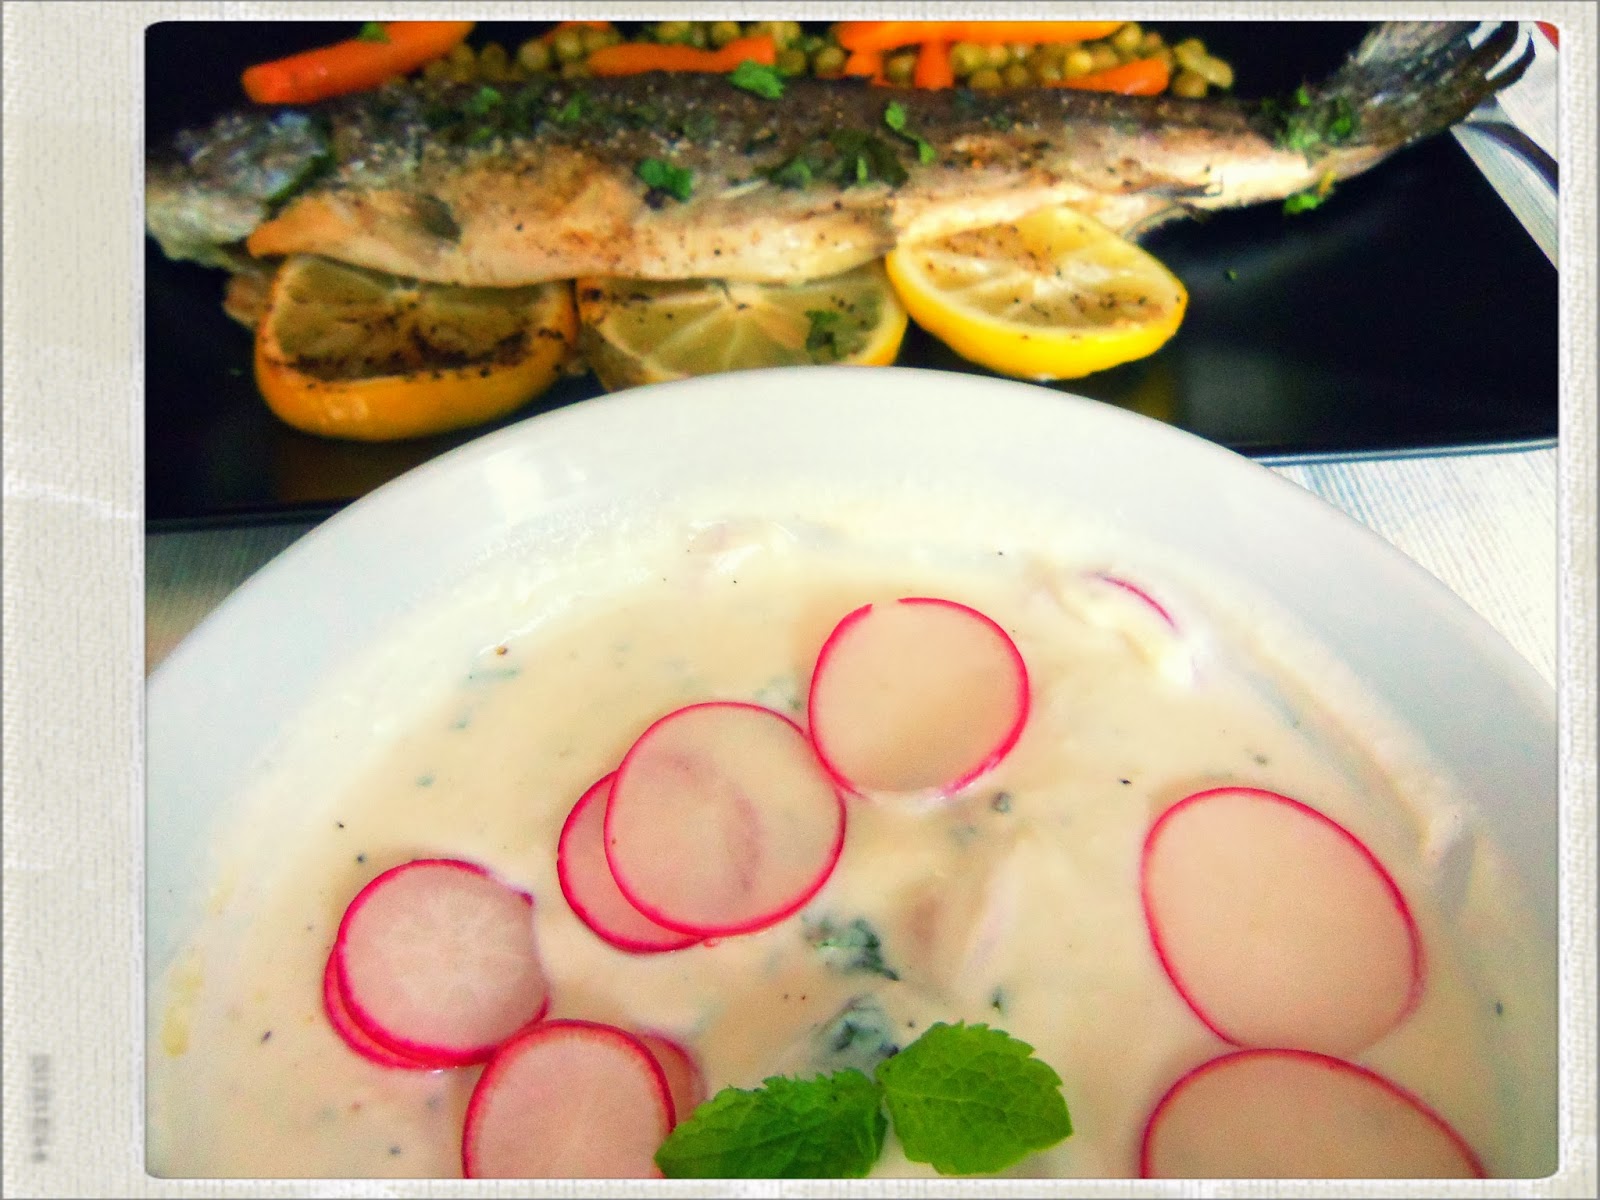
Oven Baked River Trout With Peas, Carrots And Yoghurt Sauce


This recipe is an incredibly easy one to make and prepare as it uses some very interesting ingredients that you just mix together for delicious results. It doesn’t take much time and you can prepare the side-dish and the sauce while the fish is cooking, making this a life saver when you’re  short on time.

  • For 2 fish, about 250 grams each, I used 
  • 1 lemon, cut into slices, 
  • some thyme branches, 
  • salt, pepper and olive oil. 

Clean and gut the fish, then place inside it some lemon slices and thyme branches. Place the trout in an oven tray with some ovenproof paper and sprinkle on top of the fish salt, pepper and olive oil. Let the fish cook on high heat for around 12 minutes.


The sauce really elevates this whole dish and it’s ridiculously easy to make. You’re going to need about 300 grams of creamy yoghurt (I used a combination of cow, sheep and buffalo cow with 10% fat), 3 cloves of garlic, crushed, 3 tbs of chopped mint, 3-4 small radishes, sliced thinly, salt, pepper and olive oil. Mix all the ingredients together and leave the sauce in the fridge.


For the peas and carrots I have to admit that I cheated and bought a can of pre-boiled veggies. That only needed one minute to heat up in a pan with some olive oil, no other fuss required.


Enjoy,

Thursday, September 26, 2013

Thassos, Greece- Day 3


After going to Limenas in the previous day, we decided to relax completely for one day and just enjoy the beautiful beach and the sea. We had breakfast at the villa and headed straight for the beach. We had coffee with our feet buried in sand and it was magnificent. It was a super sunny day, we got tanned and played some water tennis or whatchamacalit.


There is a reason why Golden Beach is known for one of the best beaches in Thassos if not the best.  Even if you chose a different resort at least for one day you should try the amazing sand from Golden Beach.

The sand is just perfection and the beach is quite vast.  The only downside to Golden Beach is that maybe because it wasn’t such a  popular destination until recently it is not very developed as far as shopping opportunities and nightlife goes.  


The restaurants, or better said the taverns, are great, similar to the ones in other resorts or villages.


After our first session of natural tanning we went again at Vigli, not only for the view, but this time for some quick lunch also. We chose to share a pizza at the cafĂ© bar to save some time that we would have spent waiting in the restaurant.  Everything was ok, of course we got to pet a cat after eating, I truly believe it helps with digestion, we had a beer each and headed back at the villa for a shower.  


The second part of the day we also spent at the beach until dinner time and there was no regret.


I have to say that in September, in the evening you might need a cardigan , but it was no colder than that. For dinner we went to a family tavern on the beach, but unfortunately I don’t remember the name.


We had some eggplant as a starter, fried and served with an amazing sauce, that they called garlic salad. This sauce was so amazing that it was something we had to try at home, as soon as we arrived. The eggplant was just fried and the garlic salad had Greek yogurt, olive oil, garlic, walnuts and olives or olive tapenade. Seriously now, the dip is amazing.


For the main course, I had some lobster salad, which was ok, but you can tell it wasn’t actually their specialty and my lovely husband, always craving for fresh fish had fresh tsipura on the grill.


Oh, and we drank Retsina wine which is ok, mainly because it is not that easy to find some nice wine in a casual tavern on a Greek Island. It’s fine and one good thing about it is that you can find it in restaurants in 500 ml bottles. For the rest of the vacation, retsina remained a good alternative considering that usually, when you ask for a glass of wine, you get sweet or semi-sweet wine which is not our favorite to be served during dinner.  


That was us for today.


Thank you for reading our rambling,

Wednesday, September 11, 2013

Chicken with Porcini Mushroom


For me, when someone says porcini, I get a tingling in my fingers. These are, in my humble opinion, the best mushrooms you can get or forage (let’s leave the wonderful truffles out of this, shall we? They might be mushrooms as a species, but you can’t make a stew out of them). And, for me, porcini have a different background, as they were introduced to me by the one of the most incredible people in the world, meaning my grandmother. She used to pick them herself in the forest or buy them from other foragers and I loved every tiny bit of that mushroom, any way she would cook it for me: in a stew, with different meats, grilled, boiled, didn’t matter. She was also very picky with her mushrooms: she only used young, fresh porcini, that had no sign of disease or bruising and she didn’t hesitate to throw any mushroom that wasn’t up to some very high standard. Oh, and another thing, she only eats 2 kind of mushrooms: porcini and honey fungus. Anything else, she threw away…  Honestly, nothing else. Bit weird, but she still is amazing and a great inspiration for me. 


So, when I went to visit her a couple of weeks ago, she gave me half a kilo of porcini that she pre-boiled and froze for me. What can I say, I AM her favorite grandson. So, with the mushrooms and my grandmother in mind, I decided to make a dish using the beautiful porcini. Now, chicken wasn’t a choice because I just love it, this recipe works great with some game poultry, quail or pheasant, but chicken breast is plain enough to absorb any spices you throw at it and it doesn’t outshine the porcini, so it’s a viable solution for this dish.


So, 500 grams of boiled porcini means that you can use about 300 grams of fresh ones or about 75-100 grams of dried mushrooms. When using the pre-boiled ones the advantage is that you don’t  have to cook it very long, but with the fresh ones, you get a bit more flavor. 

The meat: 1 free-range (special thanks have to go to my mother for this one) chicken breast, deboned. 

Also: 
2 tbs. of chopped fresh sage, 
a red onion, diced, 
3-4 crushed garlic cloves, 
a spicy chili, 
ground fennel seeds and cloves, 
2 bay leaves, 
Greek yoghurt, 
olive oil, 
salt and pepper, 
some rose wine (go Provence here, the Bordeaux style ones can prove to be a bit too strong for this kind of meat. If using game poultry, replace with red) 
(optional) some turmeric. 


Start of by heating up 3 tbs of olive oil in a heavy base pan, add the sage and cook it for 30 seconds, enough to create a nice and crispy outcome. Add in the chicken, cut however you want, and cook it for 5 minutes, coating it constantly with the sage. Next add the onion, garlic and chili and cook for another 3-4 minutes, after which add the boiled mushrooms, also diced. Add in the spices. Mix everything together and cook for 2 minutes, the add about 1 glass of wine. Bring to a boil on high heat, then reduce to a medium low and let it simmer until the liquid is reduce to half. In the end, add a couple of tbs. of Greek yoghurt and, optional, you can chop some parsley on the dish. Plate it, pour yourself some more of the wine and raise the glass for grandmothers everywhere, be they picky about their mushrooms or not.


Enjoy,


PS:  if using game poultry, make sure to lightly coat the meat in some flour before cooking it. This will create a nice caramelized exterior, as well help the sauce thicken.


Tuesday, September 10, 2013

Bourbon Beef Steak with Blistered Broccoli and Napa Cabbage


You know those shirts that say:“I cook with wine, sometimes I put in my food”?. Think of that and replace wine with bourbon for this recipe. You would be surprised how versatile good old Jack can be not only for the meat, but also for the side dish. So let’s start breaking this recipe down.


The meat- grab yourself a nice piece of beef steak. Now, I wanted to mix things for the meat so I did a super easy and delicious trick that can give a real lift to any steak. Cook your meat to your desired result (remember that test to check your meat by comparing to different variations of your clenched fist? Use it!). 

With one minute or so to spare throw in the pan 20 grams of bourbon and flambĂ© the meat. Also, it will impress anyone else in the room making you look like you performed a Holywood-like stunt. What can I say? The ladies enjoy a live flambee…. Back to business, let the meat rest for 3-4 minutes, lightly brush one side with some spicy mustard (try and get the type that has horseradish in it) then grab the meat and put the mustard side in some ground pepper. This will give your meat a strong, pregnant peppery taste and you can always use this trick to cover one or more sides of a steak that didn’t really came out your way.


So where should we use more bourbon you ask? Why, the sauce, of course. 
Grab yourself 75 grams of butter, 
some shimenji mushrooms (or whatever type make you happy on the inside), 
50 grams of whisky, 
50 grams of stock and 
the same amount of cream. 

Start of by melting the butter in the same pan that you cooked the meat in. Add in the mushrooms and cook them for 3 minute on high heat, then pour in the whisky. Take advantage of this occasion to perform some more pyrotechnics, cook for another minute, then reduce the heat and add the stock and cream. In about 3 minutes add the salt and pepper and remove from heat. 


For the side dish, I served the meat with some blistered broccoli and stir fried Napa Cabbage. Regarding the last ingredient, it was a nice surprise for me as its taste proved to work very nice with the meat. Simply cut it any way you want and throw it in a pan with a couple tbs. of olive oil on high heat. Cook for 2 minutes and add just a touch of bourbon to, you guessed it, flambĂ© the cabbage, cook for another 2 minutes. Touch of salt and pepper and you’re done.


The other vegetable didn’t get the bourbon treatment, but I can’t complain: Mrs. G liked it a lot, so much that I can’t cook broccoli in any other way. What can I say? Broccoli can do that to a woman. I found this recipe on Instagram, on the @bonappetitmag account. Cut the veggie into florets making sure you keep a long enough stalk for each floret.


Then cut each one in half so you have a flat surface for each broccoli. Heat up some olive oil on high heat, put the veggie with the flat side down in there and cook until you get a dark brown color. Flip the broccoli and place the pan in the oven for 10 minutes. Plate the broccoli and add a splash of lemon juice, some chili flakes and garlic slices. Absolutely delicious. It’s a wonderful way to give broccoli a nice twist, similar to a Ottolenghi recipe for a broccoli salad that applied similar that technique, but in which you first blanched the veggie before grilling it on a super hot grill.


So, that was our bourbon beef dinner, but feel free to use whisky instead of bourbon. As a suggestion here, go for Islay whisky, some Laphroaig would really hit the spot with its peaty, rich taste.


Enjoy,

Related Posts Plugin for WordPress, Blogger...