Pin It button on image hover
Showing posts with label fish. Show all posts

Wednesday, April 9, 2014

Fried Fish with Blistered Broccoli and Yogurt Sauce | You've Got Meal!


This post is supposed to be about a simple healthy recipe. Actually, when I think about a whole healthy dish the first option is some fish (simply cooked), broccoli (I love it in any way) and a cold yogurt sauce (no cooking required).

So, "surprise, surprise" last week we did just that because I wanted something really light.


For the fish:

  • You will need fillets, so if you have a whole one, you need to try to fillet it.
  • We used zander fish, you can also use perch or other fish of your choice.
  • You will need to season the fish, just salt and pepper on both sides will be fine, we also added some chili flakes.
  • Pour 1 tbs oil in a pan and fry the fillets on both sides, until golden/ golden-brown 


As a side:
  • We have used broccoli like this in this dish.
  • Cut the broccoli into florets, keeping a long enough stalk for each floret.
  • Cut each one in half so you have a flat surface to place them in a skillet. 
  • Heat up some olive oil on high heat, put the veggie with the flat side down in there and cook until you get a brown color. 
  • Turn the broccoli on the other side and pop the pan in the oven for 10 minutes. 
  • When plating the broccoli, add a splash of lemon juice, some chili slices or flakes and garlic slices.


The sauce is super simple, one you can use every time you have no idea what sauce to cook, if you run out of time or you you just need some freshness to your dish.
  • Mix in some yogurt with lemon juice.
  • To spice things up, add one crushed garlic clove, some paprika, pepper and dried oregano.
  • Being so light, this works best with fish and salads.


Enjoy,

Sunday, February 23, 2014

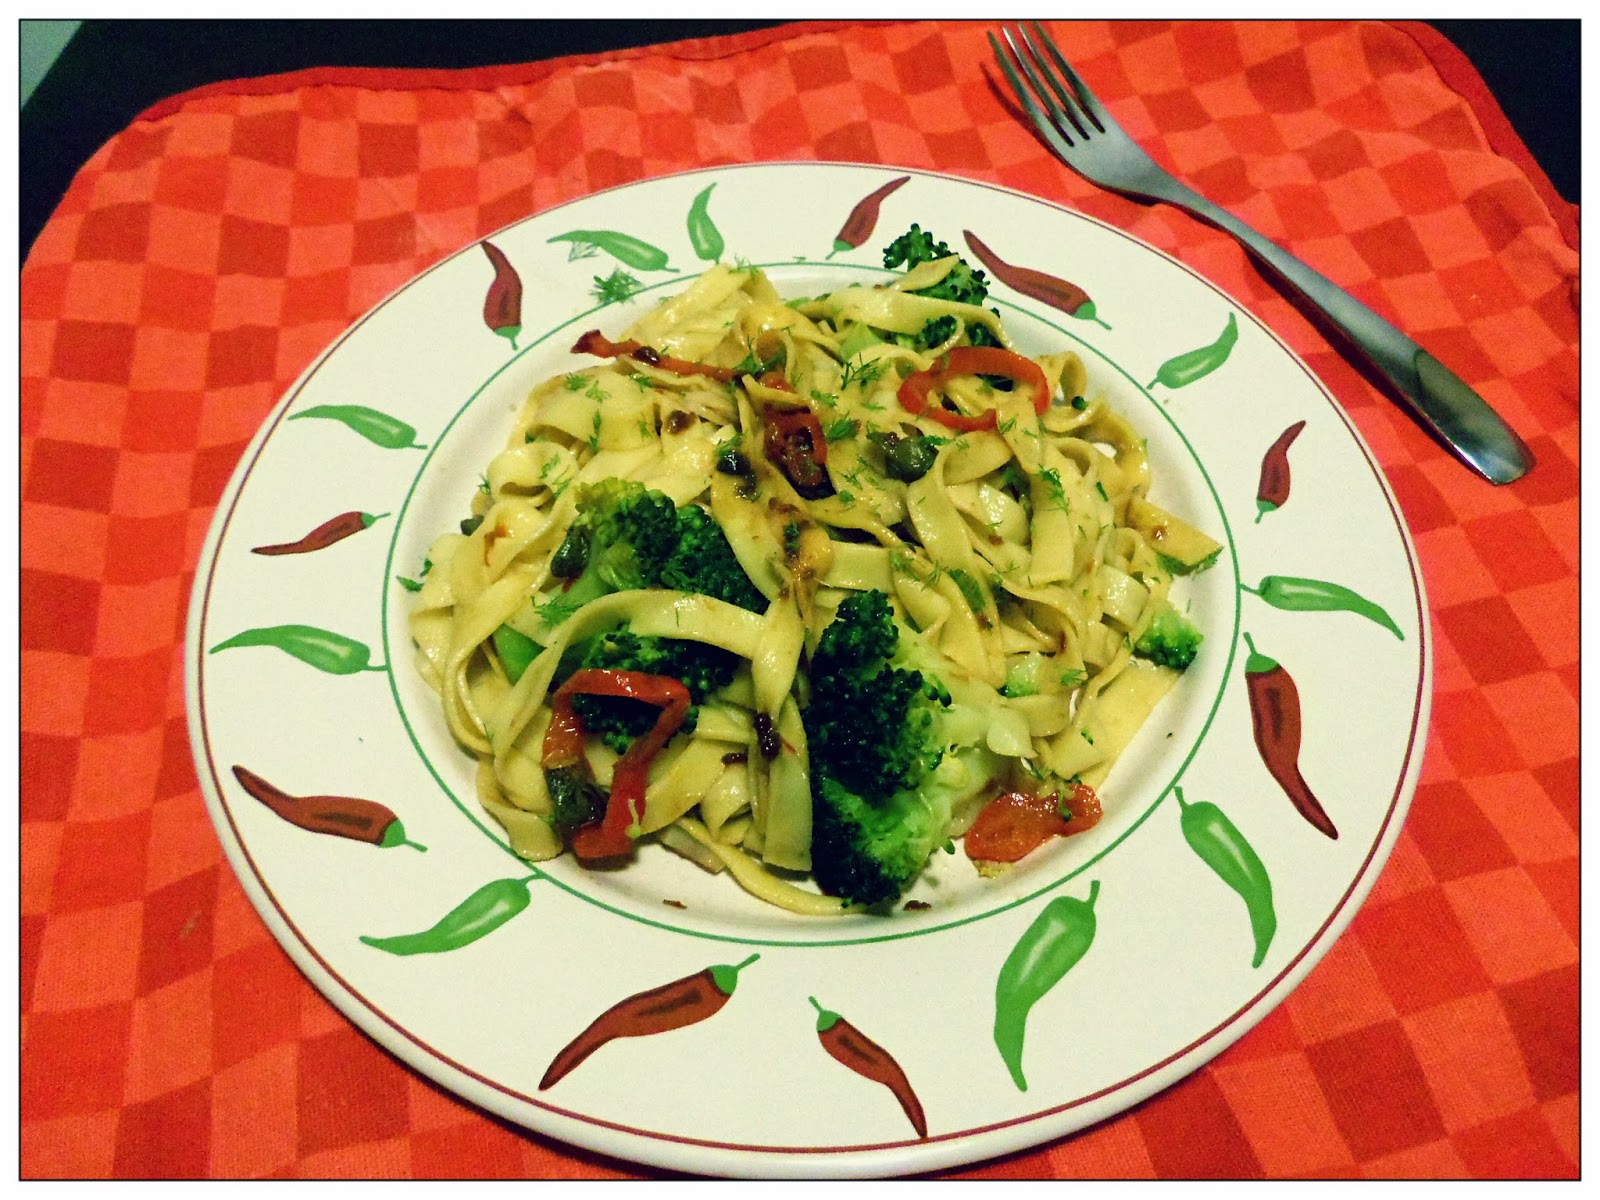
Broccoli and Anchovies Tagliatelle | You've Got Meal!


This recipe is about using some of the most common items in your pantry, in order to create a super simple and easy to cook fresh pasta recipe that is sure to give you a lift after a hard day’s work or accompany a nice glass of Pinot Grigio for brunch.


The ingredients are: 

  • Tagliatelle, of course (home made from 200 grams of flour and 2 eggs, quantities that make enough for 3), 
  • 8-9 anchovies fillets, 
  • 4-5 cloves of garlic, 
  • 400 grams of broccoli florets, 
  • about 100 grams of red pepper (we used the Kapia for this because of the shape), 
  • 50 grams of capers, 
  • the juice from half a lemon, 
  • salt, pepper, chili flakes,
  • fennel leaves or parsley for garnish

We talked a lot about homemade pasta in past posts, and we most certainly hope that you guys give it a try because it’s definitely worth the extra effort. Bring a large pot of salted water to the boil; it should be big enough to give both the pasta and the broccoli room to boil. I suggest starting with the sauce (if you can call it that) after the water starts boiling as it takes very little time and you want the pasta done in time. So, in heavy base large frying pan, heat up some olive oil on medium heat and pop in the sliced peppers and anchovies, cook them until the fish dissolves in the hot oil, it will take about 3 minutes. Again, keep in mind that you need to synchronize your pasta with the anchovies very well. 


For the homemade tagliatelle the cooking time was about 5 minutes, so we added the pasta to the water at the same moment as we started cooking the fillets. So, next, add the garlic and capers in the oil and cook for 1 minute. At the same time pop the broccoli in the pasta water and cook the vegetable and the tagliatelle for 1 minute – you want to sync the capers&garlic with the broccoli. After that, use whatever kitchen tool you need to remove the broccoli and pasta and put them in the anchovy pan. Mix the ingredients well so the tagliatelle are covered by the anchovy flavored oil. Remove from heat and sprinkle the lemon juice on the whole thing, feel free to add more if you find it necessary. For garnish you can use some parsley leaves, but we went for some fennel.


Enjoy,

Saturday, February 15, 2014

Fish Roe Salad | You've Got Meal!


This has to be one of the best and easiest to make appetizers out there, but it can have an acquired taste for some people – you are eating raw fish eggs in the end. There are a lot of possibilities from which to choose when deciding what type of fish’s roe to use, and for the recipe we went for pike. In my book, pike roe is in the top half, alongside trout roe. I like the fact that it has a medium granulation and the texture is a lot smoother than other types of roe that you could use for salad, like carp or hering. I’m pretty sure this is a well known fact, but the roe you use in salads are not the fresh ones, they are preserved with salt and plenty of it, so keep that in mind.  


Ingredients: 

  • 50 grams of pike roe, 
  • vegetable oil (make sure you use a bland oil, without a very strong flavor), 
  • lemon juice, 
  • a small onion, 
  • soaked bread (optional). 


Making the salad is a very similar process to the way you make mayo, it’s about adding periodically small amounts of oil and incorporating it into the roe. You can either use a fork and work out in the kitchen using your hands to mix the salad, or plug in the hand mixer on a low speed, it’s up to you. 

For about 50 grams of the roe we used about 100 rams of sunflower oil. We like to start by just mixing the roe without any other ingredients, in order to break some of the eggs, but not all of them -  they give a nice, pearled look to the dish. The amount of lemon juice you add is up to you, same as the moment you add it to the salad (we do that at the end).


The idea behind the use of the soaked bread is to create volume and to cheat about the amount of salad you make. You need to soak the bread in water, drain really well and incorporate it in the salad so there aren’t any lumps (don’t use crust for this). Finely slice the onion and incorporate it in the salad. You can choose to grate it if you’re not going for the crunch factor, but make sure you drain the onion really well then.


So that’s it, easy fish roe salad. For me, this always reminds me of 2 things:  Mrs. G.'s mother, who makes some great hering roe salad, and the taverns in Greece, that served this as antipasti alongside some Retsina wine. So, what about you guys, any thoughts about the dish or recipe?


Enjoy,


Sunday, January 26, 2014

Cod, Couscous and Zucchini | You've Got Meal!


Let me assure you right from the beginning that there is more to this dish than an enumeration of the ingredients listed above. The fish works great with the fluffy, flavored couscous, the mellow zucchinis elevate the combo and a harissa-yoghurt sauce brings everything together. 

So let’s talk ingredients: 
  • a couple pieces of cod (we used some frozen ones), 
  • about 150 grams of couscous,  
  • sun dried tomatoes, 
  • spring onions, 
  • 2-3 garlic cloves, 
  • 2 medium zucchinis, 
  • 1 lemon, 
  • Greek yogurt,
  • Harissa sauce.


  1. Start of by cooking the zucchini: cut them in medium sized chunks, give them a good splash of olive oil, a pinch of salt and pepper and place them in an oven proof pan, with 2 halves of a lemon. Cook in the preheated oven, medium-high heat for around 20 minutes. Taste from time to time, just to make sure you don’t overcook the vegetables.
  2. Next, the couscous. I think that the only thing simpler than cooking couscous is eating cereals for breakfast. Put the couscous in a bowl, pour hot water over it until in covers it for about 1 cm. Use some cling film to cover the bowl and wait until all the liquid is absorbed. Use a fork to fluff the couscous. Mix in some finely chopped sun dried tomatoes with a couple tbs. of their oil, crushed garlic and spring onions.
  3. You can cook the cod any way you feel like it: grilled, seared, in the oven. We rolled the cod pieces in some cornmeal crust and then we fried the fish in some olive oil until it got a beautiful golden crust.
  4. Plate everything, including  a healthy amount of yoghurt and Harissa sauce next to the fish and veggies. Grab your favorite salad mix (indulge yourself with that little cheat) and place a nice hand of the crunchy leaves, sprinkle a splash of the baked lemon juice on top. Be careful though, the juice gets a fair amount of bitterness from the zest when cooked, so it may be a little bit overwhelming. 


Trust, you can’t go wrong with this combo, it has everything you need – fish, veggies, couscous and a hell of a kick from the baked lemon juice. You can choose to replace the fish with another type, fresh herring or mackerel. Also, if you can’t get Harrisa sauce, just make your own, boil down some passata juice mixed with tomato concentrate, hot pepper jam, cumin, all spice, sugar, a touch of rose water and saffron. Or whatever  condiments you feel like having in your sauce – it’s just that easy.

Enjoy,

Tuesday, January 21, 2014

Oven Roasted Carp and Peas | You've Got Meal!


Big shocker right in the title, Internet – you can actually eat carp and it’s delicious. I’ve seen a lot of people who consider carp kind of a second-hand fish and don’t really consider it worthy for their kitchen. I can assure you that that is not the case. Fresh, river caught carp can be a knock-out at a table (in the good sense of the way) and it can hold its own against more popular fresh water fish like trout. The thing to remember here is that the bigger the carp is, the fattier it will be, so make sure to pick your fish accordingly. 


So, if you’re going for a nice oven roasted  filet, pick a leaner cut. But, let’s say, for a fisherman’s sour soup (yum, it makes my mouth watery just by typing it) or for grilling on a coal barbecue you can get a fattier piece (there is such a thing called carp belly and it’s great for this last category, with some grilled vegetables and some thyme flavored light brine).  


So let me take you through this recipe that literally takes to cook 15 minutes. You’re going  to need a lean filet of carp (about 200 grams per person), some fresh thyme leaves, a can of peas, some garlic cloves, salt, pepper and olive oil. 
  • Simply rub salt, pepper on the fish and sprinkle with the thyme leaves and olive oil. 
  • Place the carp on an oven proof rack, pop a tray under it so any juices won’t trickle directly on the oven. 
  • Cook the fish on high heat for 13-15 minutes. In the last minute, heat up some olive oil in a pan, cook a couple of whole garlic cloves for 30 seconds, then give the drained peas the same amount of time to heat through, then add some salt and pepper. 


Plate the carp with the peas and sprinkle some lemon juice on top and you’re done. Nothing fancy, nothing elaborate, everything is done in 15 minutes. If you’re looking to try some carp, don’t overdo it in your first recipe, try something simple, with only a couple of flavors, that can give you an idea of the taste of the fish and I’m sure you’re going to be back at your fishmonger for more carp.


Enjoy,

Wednesday, January 15, 2014

Tuna and Chili Pasta | You've Got Meal!

No Heat Pasta Sauce * Simple Pasta * Tuna Pasta


This is probably one of the simplest recipe on our blog and it is a great way to use an ordinary can of tuna. Pasta dishes are usually great fast solutions for weekday dinners or home made lunches in a hurry. This one is even more convenient because it only takes as much time as the pasta needs to boil and actually the skill to boil water is the only one required. :)


The final taste is quite complex, rich from the tuna, balanced by the lemon, the parsley give it the freshness and the chili just the kick it needed. The only tip I would give, especially since the dish is really affordable, is to use a nice quality tuna flakes can, being the main ingredient it really makes the difference.


Ingredients:
  • 250 g store-bought spaghetti
  • 1 185 g tuna can 
  • 1 small red onion (or half of a big one)
  • 1 hot pepper ( 1 used 3 tiny chilies)
  • 2 garlic cloves
  • 1 tbsp capers, drained
  • 1/2 handful of parsley
  • 2 tbsp oil
  • 2 tbsp lemon juice


  1. Pour the pasta in boiling water with salt and a drizzle of olive oil (for extra shine).
  2. Cook the pasta according to the package instructions. For our spaghetti we boiled them for 7 minutes.
  3. While the spaghetti are boiling, finely chop the onion, the chili and the parsley.
  4. Crush the garlic and drain the capers.
  5. Add all the ingredients in a big bowl.
  6. Add the canned tuna.
  7. Mix the lemon juice with the olive oil and pour the resulting sauce over the ingredients.
  8. Toss everything until it is well combined.
  9. Drain the pasta, add them to the sauce and mix well.


It is barely cooking, but the result is really delicious and comforting it is it worth saving the recipe for hard times, lazy nights, pasta craving or any other culinary emergencies.
I hope you try.


Enjoy,

Friday, January 10, 2014

Fresh Sardines with Chickpeas and Beets | You've Got Meal!


Butterfly sardines roasted or grilled * Beets and carrots salad * Boiled chickpeas with yogurt-harissa sauce


There are so many advantages to cooking fresh sardines that it’s hard for me to start talking about those wonderful fish. Sardines are super healthy, rich in good fats, super cheap and easy to find fresh everywhere. They’re like the fast food of the seas, except the part with the health benefits. I’ve seen a number of people who only ate canned sardines and that’s a pity, because they are missing out on something great.


Cooking this tiny tasty treat is super easy and fast, it actually takes longer to clean and gut the sardines. For this recipe, we decided to “butterfly” the fish, it looks nice in the plate and cooks faster – even though this is not such a big issue when cooking sardines. In order to butterfly the sardine, cut off the head, clean the guts out, place the fish belly side up and use your thumb to press down, near the spine of the fish, length wise, up to the tail. Remove the spine carefully pulling it out from the meat. I’m not sure if my description helps, but give it a try, it’s actually a very simple and fun process. 


Simply grill the seasoned meat or cook it in the oven – we went for the 2nd one, cooking the fish for 5 minutes at 180 Celsius. 


To accompany the fish, grab 200 grams of canned chickpeas (or boil your own) and mix them with a couple tbs. of Greek yoghurt and 1-2 tsp. of extra hot harissa sauce or another variety of a more dense spiced tomato sauce. Sprinkle some crushed (and optionally toasted cumin seeds on top).


To add some crunch to the fish and vegetable, grate a small beet and 1 or 2 carrots, season with salt, pepper, olive oil (just a small dash), the juice of 1 lemon and a 4-5 finely chopped mint leaves for freshness. 


To keep in the healthy note of the whole dish, you can sprinkle some flax seeds in the beet salad- those tiny bastards are great for you, an amazing source of fatty acids.


So there you go, super easy, super fast and super fast. Just make sure you take out the trash after cleaning those sardines, those guts are not that friendly for the nose.  


Enjoy,

Monday, December 16, 2013

Sweet Potato Salad and Simple Salmon | You've Got Meal!


This dish started with us buying a couple of sweet potatoes before Thanksgiving,  with the thought in our minds to use them for a dish for that occasion.  Lazy as we (sometimes) are we missed the deadline,  but that doesn't mean that we couldn't make a delicious dish nonetheless.


The pairing between the sweet potato and the fresh salmon works really well, but you can choose to serve just the salad, in which case just use some smoked salmon pieces.

The ingredients for 3-4 portions (depending on who is eating them):
  • 600 grams of sweet potato, cut into bite size pieces, 
  •  soy sauce, 
  • olive oil, 
  • pepper, 
  • the juice of 1 orange, 
  •  pomegranate seeds, 
  • 4-5 scallions,  
  • sesame seeds, 
  • 2-3 cloves of garlic, 
  • ginger, one thumb sized piece 


  1. In a large bowl, mix together the potatoes with 3 tablespoons of soy sauce, the same amount of olive oil and some pepper. 
  2. Place the yams in oven proof tin lined with cooking paper, making sure they're not too crowded. 
  3. Sprinkle sesame seeds on top and mix in the tin. 
  4. Put the potatoes in the oven, 170 Celsius,  for about half an hour or until the yams are done- do a taste test, they get creamy on the inside and with a slight crust on the outside. 
  5. Put the potatoes on a plate and sprinkle the chopped scallions on top, same for the pomegranate seeds and the thinly sliced garlic. 
  6. For the dressing mix the orange juice, 1tbs of olive oil, salt, pepper and 1/2 of a teaspoon of finely grated ginger. 
  7. Pour the some of the dressing on the potatoes and mix to coat.


The salmon: we had a couple of steaks, 200 grams each.

  1. Make sure they are boneless, move your hand on top of the meat, looking for anything resembling the pinch of a bone. Remove them before cooking. I've seen most of these bones especially in thicker pieces of meat. 
  2. Sear the salmon on high heat, in a couple tablespoons of olive oil for 1 minute on each side. 
  3. Next, pop the fish in the oven,  skin side down,  160 Celsius,  for around 10 minutes.  
  4. In the last minute, pour a few drops of the salad dressing on top of the fish, and, if you feel like necessary, turn it up side down in order to get more of a crust on the meat. 
  5. Don't put the orange juice too early, the sugars in it will burn.
  6. Garnish the salmon with some chives and serve it with the sweet potatoes salad. 
Crazy-simple and goooood!

The fish and the yams go great together and, like I said before, you can choose to use smoked salmon. Or you can decide to use the yams as a side dish for something else.  In any case, the sweet potatoes are (even if a little late) a great Thanksgiving or Christmas side dish recipe.


Enjoy,
Related Posts Plugin for WordPress, Blogger...