Pin It button on image hover

Saturday, October 26, 2013

Lumaconi alla Parmigiana- Oven-baked Vegetarian Pasta | You've Got Meal!

While we were grocery shopping we stumbled upon a great variety of pasta. Even though we like to make our pasta from scratch, sometimes is nice to come home in the evening and put together some pasta and other simple ingredients for a nice, under 30-minutes dinner.


We got some Pizzocheri pasta, that still wait patiently in the pantry, and a pack of Lumaconi. Lumaconi is a snail shell shaped type of pasta, that is quite thick and long, which makes them perfect for very al dente boiling and oven baking to finish the cooking.


I like my pasta dishes 2 ways, really light and simple or super cheesy, and I always thought that oven baked pasta is super filling. that is why I wanted to go for a meatless choice for Lumaconi. Eggplant or aubergine is a great choice for vegetarians, being high in fiber content it makes you feel full.


The usual layers needed for an oven baked pasta dish are the pasta, some sauce or filling and some other sauce or topping to seal everything. I chose not to fill the pasta to save time, but the flavor was not lost.

I started off by preparing the sauce:
  • 4 tbs olive oil
  • 4 cloves garlic finely chopped
  • small handful of olives, pits removed and cut in round slices
  • 1200 ml tomato passata/ pulp (of course you can make your own)
  • 1/2 tsp salt
  • Heat up the oil, add the garlic, then the olives, stir well.
  • Add the tomato paste and let the sauce thicken, stirring from time to time. I let it simmer for about 15 minutes with the lid on because it gets bubbly.

You will also need:
  • 1 small eggplant
  • 500 g dry Lumaconi pasta
  • 500 g mozzarella, cut into cubes
  • some basil leaves, depending on how much you like basil
  • 100-140 g Parmesan
  • some olive oil, to oil the baking tray
  • While the sauce simmers, cut the eggplant into slices and then into cubes, deep-fry it until it gets golden, then take it out on an absorbing paper towel.
  • Boil the Lumaconi really al dente.
  • Grate the Parmesan and prepare the basil leaves.

To arrange the ingredients in a tall baking tray:

  • Oil the baking tray bottom and sides with a soaked napkin.
  • Pour 3/4 of the sauce on the pasta and mix well, you can  always fill the shells with the sauce. Put aside the remaining sauce.
  • Start with a Lumaconi and sauce layer, then add half of the eggplant, half of the mozzarella, some basil leaves and half of the Parmesan.
  • Continue with the other Lumaconi layer, eggplant, mozzarella, basil, Parmesan.
  • Finish off with the remaining sauce.
  • Bake in the oven for 40 minutes, medium heat.

It really is a nice dish, is quite impressive and it is way more easy to make than it seems. We were really satisfied with the result and we hope you try it also. It is great served immediately, but in arder to set a little and have a nice and firm shape like in the first picture, let it acool for a bit.


Enjoy,

Thursday, October 24, 2013

Fig and Honey Yogurt- Easy Dessert Recipe | You've Got Meal!


 This post is more about an idea than an actual recipe.


Mixing honey with yogurt is not a real brainstorm here, but you can use that base to build your own version of super easy, healthy and delicious dessert. Why bother to buy some artificial flavored yogurt or other type of sweets when you can make your own? For the version that we made for this post we decided to make the fig the star of the dish. Also, to bring a bit more crunch to the dessert we added some roughly chopped almonds. And to bring a little more zing to the whole dish , we sprinkled some pomegranate seeds on top.


 So, creamy yogurt, honey (use a flavorsome kind- acacia, orange blossom, pine tree, etc.), figs , almonds and pomegranate. Dead easy and incredibly savory. I’m sure you can think of many other combinations that can level this yogurt up, for example you can add a little touch of freshly grated ginger to spice things up or use some chopped fresh coconut as crunch. Go nuts, both literally and figuratively.   


Enjoy,

Monday, October 21, 2013

Rice-filled Pumpkin | You've Got Meal!


It took for us to make our own blog in order to start cooking pumpkin, but the wait was worth. Growing up the only way we actually ate pumpkin was in (a very nice) pie, that, I have to admit, is one of the best smelling dishes I’ve ever seen. But bringing this seasonal ingredient to a salty dish was something I wanted to do for a very long time and I started with the stew posted last time. This time, the dish is a little flashier and it can certainly make you feel badass in front of your guests. Honestly, bringing a neat looking pumpkin filled with a spicy, creamy rice to the table has to score some points with the company you keep. 


Let’s start of with the ingredients that I used for filling a pumpkin about 1,3-1,5 kilo pumpkin: 
about half a cup of risotto rice, 
1 medium onion, 
3-4 cloves of garlic, 
1 medium beet, 
4 tbsp capers 
1 chilli, 
cinnamon, ground cumin and cardamom, 
salt, pepper, 
75 grams of butter, 
olive oil and 
100 grams of grated Parmesan. 


And of course the above said pumpkin and its insides. A couple of things about the ingredients: I decided to fill the pumpkin with a risotto style rice and, also, add cheese to this combination, but you can easily turn this recipe in a vegetarian star by using soy or coconut milk/cream, in which case a slightly more oriental touch of aromas could be in case. For the pumpkin, pick a healthy, sturdy one, with no visible marks or soft areas – those can give you trouble in the oven. You need to remove the insides of the “beast” before beginning, but don’t throw it away, you’ll integrate it in the rice. Also, make sure you don’t throw the top of the pumpkin, you’ll use it later.


  • To start things of, cook your beet in the oven. First wash the root vegetable, pat it dry, place it on a piece of tin foil, splash a small amount of olive oil on the beet, some salt then close the foil on the vegetable, creating a wrapper that still holds enough room for the steam to build in there. The cooking time depends on the size of the beet, in this case it took 45 minutes. The vegetable is done when you can easily stick your knife through it. When the beet is done, remove the foil, let it cool down then finely cut it -  set aside. 
  • Next, start making your risotto by cooking the finely diced onion and garlic for a bout 4 minutes on high heat, in some olive oil. Next add the beet,  the capers and the pumpkin insides (you won’t be able to use all of it, so keep around 1 cup of the finely diced pumpkin “entrails”). Cook the vegetables for another 3 -5 minutes. Add in the rice and all the spices and cook them for a minute before adding the liquid – use only stock or add wine, if you feel like it (1 part wine to 3 parts stock, make sure you simmer the wine down before adding the rest of the liquid).You need to cook the rice to about 90% done, so make sure you taste your rice -  it should take around 20 minutes on a medium high heat. 
  • Remove the rice from the stove, add in the butter and mix things. 
  • Next, start filling the pumpkin with the creamy rice – add a couple of tbs. of rice and top those with a heavy layer of cheese. Keep going until you’re almost at the top -  don’t completely fill the pumpkin up t the top, it will need some space to bubble up when the insides  start cooking. 
  • Place top on the pumpkin and put in an oven tray, with some oven proof paper, on medium heat and cook for about 30 minutes. 
  • You can choose to serve the pumpkin whole and cut it at the table or slice it yourself before plating, either way make sure to add some green to the dish with some chopped  parsley or oregano or basil or thyme or mint. Pick one already. And then eat, you’ll like it. 


Oh, and I can’t end this recipe without making this point: you can always use bacon in cooking the rice, just saying, no pressure……

Sunday, October 20, 2013

Roasted Chicken with Spicy Brussels Sprouts | You've Got Meal!


This dish is another one that here, in the YOUVEGOTMEAL! kitchen, sooths us when the cold starts banging at our door. For me, any roasted meat does that trick and the spicy, lemony  (also adorable) cabbage goes really well with it.


For the meat use a couple of chicken pieces, upper and lower leg, a breast with bone (you can choose to cut it in half), the drums of the wings, you get the idea – the meaty parts. 

Mix some white flour with some ground pepper, smoked paprika and turmeric (about 1 tsp of each). Wash and pat dry the meat, then  coat the chicken in the flour until has a light layer all over. Heat up some olive oil and cook the floured meat on all sides until golden, shouldn’t take more than a couple minutes. 

Next, arrange the meat in an oven tray, cut around 300 grams of potatoes into cubes and place them aside the meat. Sprinkle some more olive oil, salt, pepper and put the tray in the oven on medium high heat for about 30-40 minutes.


For the sprouts: 
500 grams of cabbage, 
a thumb size of ginger, grated, 
1 handful of chopped green onions, 
2-3 garlic cloves chopped, 
the juice of 1 lemon, 
salt pepper, olive oil. 

Put everything into an oven tray that can be covered with a lid, making sure to coat the sprouts with all the flavors. The cabbage will only take around 15 minutes  to cook, so wait before putting them in the oven, next to the meat. I like the sprouts to cook whole, you can choose to cut them in half or quarters, but be warned that the cooking time will drop.


Plate the meat, spuds and sprouts and sprinkle some more green onions (or chives) on top.


Enjoy,

Thursday, October 17, 2013

Autumn Stew | You've Got Meal!


There are only a few dishes that, cooked during the cold seasons, can make me feel better about the crappy weather outside, and this stew is one of them. You can always come up with another combination of vegetables or other meats for this one, but I was pleased (and warmed) by the result.


So, grab yourself 2 medium onions, an obscene amount of garlic (don’t worry about the amount, when cooked in stews garlic gives a rather sweet taste instead of, well, garlic taste), 2 carrots, 200 grams of honey fungus (during this time of the year this mushroom is available in farmer’s markets), 200 grams of pumpkin (with or without skin), 300 grams of potatoes, 150-200 grams of quince, 150 grams of smoked bacon, some nigella seeds, fresh  oregano, sage and parsley, salt, pepper, 500 ml of dark beer (I used Guiness in this recipe).


Start of by heating up a good amount of olive oil in a heavy base, tall pan, then pop in the diced onion and garlic. Cook on medium heat for 5 minutes, then add in the sage, finely diced carrots and bacon -  cook them for another 3-4 minutes. Add the pumpkin, quince, both finely diced, and the honey fungus. Give everything a good mix, so that the hard vegetables get covered in the flavorful oil and bacon, cook for another  4-5 minutes. Pour in the beer, crank up the heat, add salt, crushed nigella seeds, pepper and 1 tbs. of chopped oregano leaves and reduce the liquid to about a third. Next, reduce the heat to medium low, put in the spuds, cover the pan and let it simmer for about 25-30 minutes. 


You can check to see if the vegetables are done during this time, this is especially useful if you decide to leave the skin on the pumpkin, which makes cooking the vegetable in case takes longer. Garnish the stew with some chopped parsley and, if you feel like it, pour a couple tbs. of heavy cream on top.

Serve this stew with some spicy pickled cauliflower for a more rustic feel and, if you really feel like the incoming winter is getting on your nerves, don’t forget about a nice cup of mulled wine. 


Enjoy,

Sunday, October 13, 2013

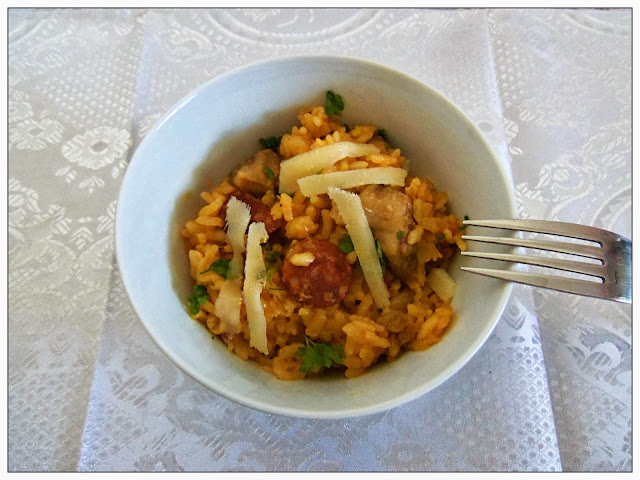
Chorizo, Cauliflower and Porcini Risotto| You've Got Meal!


Cooking rice is something that doesn’t happen nearly enough in our kitchen, so, when we had to plan a meal for a couple of guests coming over, this risotto dish came to mind. Maybe I was influenced by the fact that we had all in the ingredients in our pantry or fridge, but who knows?


So, a nice piece of spicy chorizo sausage, about 200 grams, cut into slices, 
200 grams of cauliflower florets, 
300 grams of porcini , cut into big chunks (that’s the way I like them, feel free to change it), 
1 large onion diced, 
3 cloves of garlic, diced, 
about 220-250 grams of rice (use a risotto appropriate variety), 
100 grams of a good quality dry white wine, 
400 ml of vegetable or chicken stock, 
100 grams of butter and 
your heart’s desire of parmesan, salt, pepper and olive oil.


 Start of by cooking the onion and garlic on high heat for a couple of minutes, until they start softening. Add the meat and cook it for another 3-4 minutes, after which add the mushrooms and give those another 4 minutes, making sure that they are coated in the chorizo infused oil in the pan. Throw in the cauliflower and cook that for another 3-5 minutes. Add the rice, salt and pepper and cook it without liquid for 2 minutes, constantly stirring so that it mixes with the rest of the ingredients. Add the wine and reduce it on high heat down to about a third. Add the stock, reduce heat to medium-low and cook until the liquid has reduced enough and the rice has a creamy rich consistency. If necessary, add more stock.


Right at the end, put in the butter and whisk it in so that it melts and mixes in uniformly. Remove from heat and add the grated parmesan, whatever quantity you feel like and some parsley (optional, our guests didn’t need it). If you feel that the chorizo doesn’t hold the spicy kick you need in this risotto, add a diced red (for visual purposes) chili with the onion and garlic.


 To serve as a salad for this risotto, I opted for a very nice lemony, crunchy blistered  broccoli. I already explained how to make that in this recipe, the difference in this instance being that I didn’t add garlic but only lemon, some more olive oil, salt, pepper, chili and some tomato tiny cubes. If you have some nice salad leaves (some lola rosa works nice for taste and it brings a nice visual upgrade) you can mix them in for a more salad-ish feel to this broccoli.
  

Enjoy,

Saturday, October 12, 2013

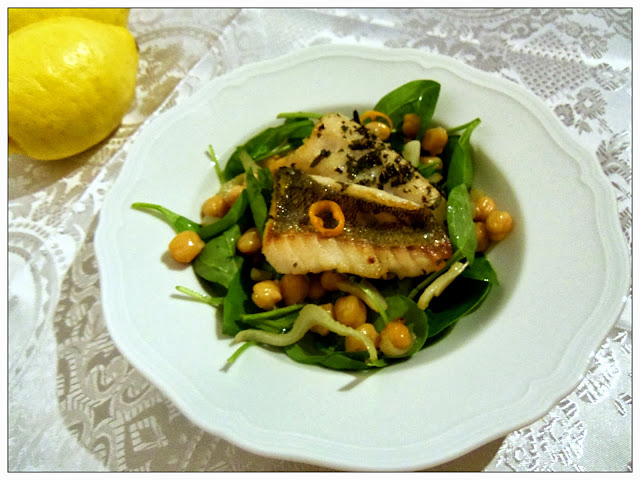
Fried Perch Fillet With Chickpeas And Spinach


This dish should be the picture front for the definition of light dinner. It’s subtle, light, flavorsome, super easy to make and a nice sight on the table. I used perch for this dish because I had it in the fridge, but feel free to substitute it with any fish at your convenience, be it fattier or not -  the side dish packs enough lemony, tangy taste to overcompensate for some salmon, for example.


The amount you use totally depends on how many people you plan on cooking for. For the side dish: chickpeas (for 4 portions I used around 100-130 grams of beans), 1 fennel bulb, 2-3 garlic cloves, lemon, 100 grams of baby spinach leaves, 1 chili, 1 tbs of sugar, salt, pepper, olive oil.


Boil the chickpeas, it helps if you keep it in water the night before. Remove the beans from water and put them aside. Slice the fennel, dice the garlic, slice the chili and pop them all in pan with some hot olive oil, cook on medium heat until the fennel softens. Add the chickpeas, sugar, salt, pepper and mix well to make sure the beans get coated in melting sugar. Add the juice of 1 lemon and, again, mix all the ingredients together, cook until all the liquid from the citrus has almost evaporated. You can now choose to mix the spinach leaves for a minute with the chickpeas still on the heat, thus mellowing the greens, or just mix them off the heat, keeping them crunchy (I prefer it that way). Sprinkle some more olive oil and lemon juice to the side dish if you feel the need to. 

To prepare the fish, just fry in it a pan with a couple tbs. of olive oil until cooked (the time depends on the type of fish and its thickness). Sprinkle some salt and pepper and place the fish on top of the chickpeas.  


Enjoy,
Friday, October 11, 2013

Parsnip Soup


Winter is coming! And not only in Game of thrones, but also in real life. You know, real life, that kind of stuff you read posts about on Facebook. Anyway, with summer fading away so did our beautiful vacation in Thassos (if you haven’t read about it you should. It’s illegal not to. Where, you ask? In your country, go figure), and so I decided to bring a touch of autumn in the YOUVEGOTMEAL! kitchen with this parsnip soup. 

You can find many varieties of this dish in the great world of Google, but, in case you didn’t know this about me, I tend to get lazy sometimes… maybe a lot. So I just clicked the 1st search result which was a Jamie Oliver variation of this soup.


I liked what I read, and, with a few changes from the Naked Chef, things went like this, ingredients wise:
  • 1 big onion                                            
  • 4-5 cloves of garlic (use a sweeter variety if you can)
  • 1 piece of ginger, thumb size
  • About 750 grams of parsnip, cleaned
  • A couple of bacon strips
  • 1 red or orange chilli (optional)
  • 750 grams of milk
  • About 1 l of vegetable stock
  • Nutmeg, turmeric, cumin, green pepper and salt
  • Olive oil 


The beautiful thing about a cream soup is that you don’t really have to bother to chop your veggies finely and this is not an exception. Chop everything roughly, anyway you feel like it. Heat up the oil and pop in the onion, garlic, ginger and spices. Gently fry the onion on a medium low heat until it softens. Add the parsnip and coat it in the aromatic onion-garlic mix. Add the liquids and cook the vegetables on medium heat until the parsnip softens. To test it just try and put a toothpick through it, if it goes in easily you have a winner. Remove from the stove and blitz the soup. Taste for more salt and pepper.

You can serve it like this, but for a more elaborate approach finely slice your chili, fry a strip of bacon, break a couple of parsley leaves (or coriander) and sprinkle that on top. I have nothing but love for you veggie lovers out there, but I can’t just say no to bacon. It just makes things better, like wine, you just need to know when to stop.


Enjoy,

Wednesday, October 9, 2013

Oven Baked River Trout With Peas, Carrots And Yoghurt Sauce


This recipe is an incredibly easy one to make and prepare as it uses some very interesting ingredients that you just mix together for delicious results. It doesn’t take much time and you can prepare the side-dish and the sauce while the fish is cooking, making this a life saver when you’re  short on time.

  • For 2 fish, about 250 grams each, I used 
  • 1 lemon, cut into slices, 
  • some thyme branches, 
  • salt, pepper and olive oil. 

Clean and gut the fish, then place inside it some lemon slices and thyme branches. Place the trout in an oven tray with some ovenproof paper and sprinkle on top of the fish salt, pepper and olive oil. Let the fish cook on high heat for around 12 minutes.


The sauce really elevates this whole dish and it’s ridiculously easy to make. You’re going to need about 300 grams of creamy yoghurt (I used a combination of cow, sheep and buffalo cow with 10% fat), 3 cloves of garlic, crushed, 3 tbs of chopped mint, 3-4 small radishes, sliced thinly, salt, pepper and olive oil. Mix all the ingredients together and leave the sauce in the fridge.


For the peas and carrots I have to admit that I cheated and bought a can of pre-boiled veggies. That only needed one minute to heat up in a pan with some olive oil, no other fuss required.


Enjoy,
Related Posts Plugin for WordPress, Blogger...