Pin It button on image hover
Showing posts with label 30 minute meal. Show all posts

Wednesday, April 9, 2014

Fried Fish with Blistered Broccoli and Yogurt Sauce | You've Got Meal!


This post is supposed to be about a simple healthy recipe. Actually, when I think about a whole healthy dish the first option is some fish (simply cooked), broccoli (I love it in any way) and a cold yogurt sauce (no cooking required).

So, "surprise, surprise" last week we did just that because I wanted something really light.


For the fish:

  • You will need fillets, so if you have a whole one, you need to try to fillet it.
  • We used zander fish, you can also use perch or other fish of your choice.
  • You will need to season the fish, just salt and pepper on both sides will be fine, we also added some chili flakes.
  • Pour 1 tbs oil in a pan and fry the fillets on both sides, until golden/ golden-brown 


As a side:
  • We have used broccoli like this in this dish.
  • Cut the broccoli into florets, keeping a long enough stalk for each floret.
  • Cut each one in half so you have a flat surface to place them in a skillet. 
  • Heat up some olive oil on high heat, put the veggie with the flat side down in there and cook until you get a brown color. 
  • Turn the broccoli on the other side and pop the pan in the oven for 10 minutes. 
  • When plating the broccoli, add a splash of lemon juice, some chili slices or flakes and garlic slices.


The sauce is super simple, one you can use every time you have no idea what sauce to cook, if you run out of time or you you just need some freshness to your dish.
  • Mix in some yogurt with lemon juice.
  • To spice things up, add one crushed garlic clove, some paprika, pepper and dried oregano.
  • Being so light, this works best with fish and salads.


Enjoy,

Thursday, March 6, 2014

Tempura Mushroom with Wassabi | You've Got Meal!


If you Internet people out there have read any of our previous posts before (who am I kidding, I know you love us), you’ve probably noticed the fact that we talked a lot about the pleasure of keeping, sometimes, things simpler in the kitchen. 


Of course we love to get fancy, combining spices and ingredients, adding and taking quantities, but, in the end, we get the best satisfaction from the simple or the classic (take our home-made pasta or the duck fat fries). Same thing goes for frying veggies in tempura batter, and I remember last spring when we had the best baby zucchini ever, just fried in some tempura.


We’re not really describing a recipe here, we’re rather telling you of a great cooking experience when we combined tempura batter and some beautiful oyster mushrooms.

Making the tempura batter couldn’t be easier, you just need some fizzy water and wheat flour. I guess you do have to be determined to do it, I remember Mrs. G saying “I’m gonna own this batter” before starting. We used one egg, 200 ml ice cold sparkling water and 250 g smooth flour, but the thing you have to remember is 1. Use ice cold fizzy water, or even add an ice cube to the mixture and 2. Don’t overwork the batter.

For a bit of a kick, we added about 1 tsp. of wasabi paste in the tempura, just enough to give it a slight punch.


Separate the oyster mushrooms and dip the separately in the batter for a couple of seconds, dripping the excess of tempura. Fry the oyster mushrooms in some super hot cooking oil, until it gets a nice golden color on each side, and you’re done. Don’t keep the mushrooms for too much in the oil, the batter will burn and they will get soggy, you want to keep a firm texture.


We used the mushrooms as a great side-dish for some great duck breast, but that’s a story for another time.  


Enjoy,

Saturday, March 1, 2014

Spinach and Ricotta Ravioli | You've Got Meal!


This is our first ravioli making experience, so we wanted to cook something on the easy side, but also a well known dish, so we went for safe and picked the spinach and ricotta recipe. 

We used 4 sheets of pasta dough, about 40 cm long and 6 cm wide, enough to make around 20 pieces of ravioli. 


For the filling: 
  • 200 grams of fresh spinach leaves- hard stems removed, 
  • 130-150 grams of ricotta, 
  • 4-5 tbs. of parmesan, 
  • nutmeg, 
  • salt and pepper. 


We also made a fresh tomato and basil sauce using: 
  • 1 can of whole tomatoes, 
  • 300 grams of passata, 
  • 3 garlic cloves, 
  • 2 tsp. of dried basil leaves, 
  • salt, pepper, 
  • cloves, 
  • olive oil. 


  1. Start of by making the dough for the pasta -  as usual, we used 200 grams of plain flour and 2 free range eggs, resulting the sheets of pasta described above. 
  2. While the dough rests, awaiting to be rolled, cook the spinach in a couple tbs. of olive oil for 2 minutes, enough for the greens to melt. 
  3. Remove the spinach from heat, dripping any excess of juices that remained in the pan – those will make the filling way too runny and most likely cause the ravioli to open while cooking. You can choose to leave the spinach leaves whole, finely chop them or just coarsely break them, take your pick. 
  4. After the spinach cools for some minutes, mix them well with the ricotta, nutmeg, salt, pepper and about 4-5 tbs. of Parmesan. 
  5. You can either cut the ravioli pasta pieces before putting in the filling or you can spread lumps of the spinach&ricotta mix on the sheet of pasta, and then cut it. Use a beaten egg to brush the edges of the pasta so that the pasta sticks -  you can also use a fork to press the edges of the ravioli, but make sure to remove the air from inside before. 
  6. The ravioli cook fast enough in the salted boiling water, about 4 minutes. 
  7. When removing them from the water lightly drizzle them with olive oil to make sure they don’t stick.

The sauce keeps the same super easy line of cooking – on medium heat, bring to a boil the canned tomatoes (use a wooden spoon to break them in the pot), 300 ml of tomato passata, the finely sliced garlic cloves, the basil, salt, pepper, 2-3 whole cloves, and cook until the liquid is reduced to about two thirds. Next, push the sauce through a fine sieve (don’t forget the garlic slices, they will be soft enough to be pushed through) in order to create a smooth, light tomato and basil sauce. 


That’s it really incredibly easy to make ravioli, accompanied by an light and elegant sauce that will complement the pasta perfectly. Garnish with some fennel leaves or basil or parsley, grate some Parmesan on top and you are done.

Enjoy,

Thursday, February 27, 2014

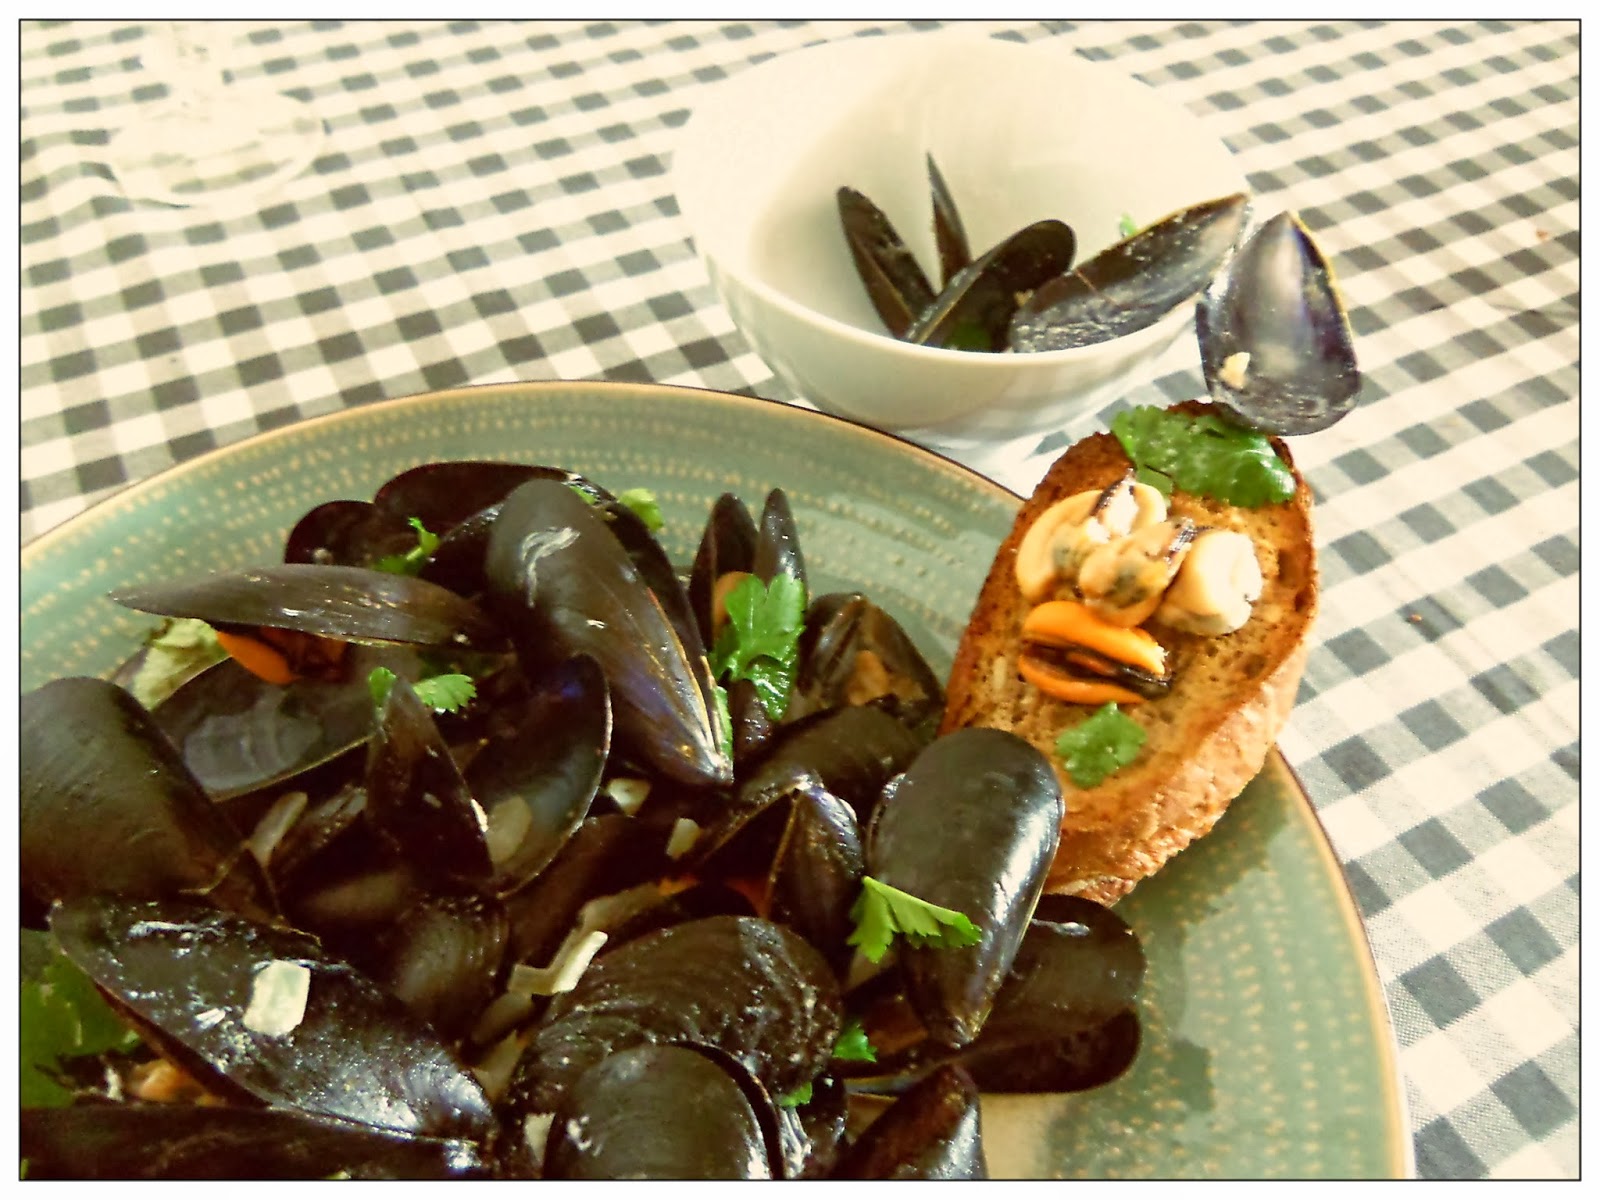
Mussels in White Wine Sauce (Moules Mariniere) | You've Got Meal!


Mussels are one of our favorite choices when we want to cook seafood in the Youvegotmeal! kitchen, and for obvious reasons. They’re delicious, light, easy to cook and look great at the table. 


Unfortunately, when dealing with fresh mussels the most difficult part is cleaning them, but you can’t skip this part, especially when you’re using them whole. Scrub the mussels with a wire wool and make sure to remove the “mustache” or “beard” of the clam, meaning the algae that sometimes hangs from inside the mollusk.


 Cooking the mussels in some white wine sauce is one of the classic ways to do it and I’m sure you can find dozens, if not hundreds, of variations of this dish on-line. The concept is a simple one, and we made best with ingredients at hand:

  • 1,5 kg of whole mussels, 
  • 1 medium onion, 
  • 3-4 garlic cloves, 
  • some nice dry white wine, 
  • coriander, 
  • parsley, 
  • salt, pepper,
  • olive oil, 
  • cooking cream


  • First of all separate the leaves and stalks of your greens. The idea is to use the leaves, that are more tender in the end of the cooking process and the stalks from the beginning. 
  • Bind the stalks of coriander and parsley with some string in order to easily remove it later – you can also add some lemon thyme springs to the coriander and parsley stalks and create a very nice bouquet garni. 
  • Next, start  cooking the finely diced onion and garlic cloves in the hot oil, on medium heat, for 3 minutes, with the stalks in. 


  • Add the wine, about 100-150 ml, bring to a boil, kick the heat up and pop the mussels in. 
  • Cover the pan and let the clams open in the wine steam for 4-5 minutes- throw away any mussels that don’t open. 
  • Remove the top, add some cooking cream for color (about 50 ml) with the parsley and coriander leaves. 


Serve the mussels with some crunchy bread and the rest of your white wine.


Enjoy,

Saturday, February 15, 2014

Fish Roe Salad | You've Got Meal!


This has to be one of the best and easiest to make appetizers out there, but it can have an acquired taste for some people – you are eating raw fish eggs in the end. There are a lot of possibilities from which to choose when deciding what type of fish’s roe to use, and for the recipe we went for pike. In my book, pike roe is in the top half, alongside trout roe. I like the fact that it has a medium granulation and the texture is a lot smoother than other types of roe that you could use for salad, like carp or hering. I’m pretty sure this is a well known fact, but the roe you use in salads are not the fresh ones, they are preserved with salt and plenty of it, so keep that in mind.  


Ingredients: 

  • 50 grams of pike roe, 
  • vegetable oil (make sure you use a bland oil, without a very strong flavor), 
  • lemon juice, 
  • a small onion, 
  • soaked bread (optional). 


Making the salad is a very similar process to the way you make mayo, it’s about adding periodically small amounts of oil and incorporating it into the roe. You can either use a fork and work out in the kitchen using your hands to mix the salad, or plug in the hand mixer on a low speed, it’s up to you. 

For about 50 grams of the roe we used about 100 rams of sunflower oil. We like to start by just mixing the roe without any other ingredients, in order to break some of the eggs, but not all of them -  they give a nice, pearled look to the dish. The amount of lemon juice you add is up to you, same as the moment you add it to the salad (we do that at the end).


The idea behind the use of the soaked bread is to create volume and to cheat about the amount of salad you make. You need to soak the bread in water, drain really well and incorporate it in the salad so there aren’t any lumps (don’t use crust for this). Finely slice the onion and incorporate it in the salad. You can choose to grate it if you’re not going for the crunch factor, but make sure you drain the onion really well then.


So that’s it, easy fish roe salad. For me, this always reminds me of 2 things:  Mrs. G.'s mother, who makes some great hering roe salad, and the taverns in Greece, that served this as antipasti alongside some Retsina wine. So, what about you guys, any thoughts about the dish or recipe?


Enjoy,


Friday, February 14, 2014

Sticky Ribs with Goose Fat Fries | You've Got Meal!


Ah, sticky ribs, the reason God gave you fingers. And there you go. Enjoy! Just kidding, Mrs. G says I have to give you guys the full details of the recipe. Not that I wouldn’t have done that, but I think I mentioned before I’m kind of lazy. 


The main idea of the whole meal is to enjoy a Friday night sticky, greasy, delicious dinner made of some oven baked ribs, some potatoes cooked in goose fat, everything balanced by some crunchy and tangy salad leaves with beets and pumpkin seeds. 

The ingredients we used: 
  • 3 single ribs, about 100 grams each (makes it easier to cook), 
  • some potatoes, preferably new, 
  • salt, pepper, 
  • thyme, oregano, smoked paprika, 
  • ketchup. 


For  the salad we had some crunchy iceberg leaves, with some radicchio rosso, an oven cooked small beet, cut into sticks, pumpkin kernels, salt, pepper, olive oil, lemon juice, red wine vinegar and a tsp. of some not very strong mustard.


I find that cooking ribs has a positive effect on my mood, maybe because of the delicious smell of grease and condiments melting away into something great. Despite that, it has a definite negative impact on the look of the kitchen, especially if you pan sear it. So, I like to slow cook the ribs in the oven, in an covered tray until the fat melts and the meat gets nice and tasty.


  1. Start of by rubbing the meat with the dry condiments and some salt. 
  2. For the next step, you can choose to use a tray with a grill on top, so the fat will melt and fall into that, or you can place the ribs straight in an oven tin, in which case the fat will melt and the ribs will also cook in it. 
  3. We went for the second, mainly because I find that cooking meat in fat of any kind makes it really tender and elevates the taste. 
  4. So, we covered the tray with some tin foil, and cooked the meat for 80 minutes on a medium low heat, turning the ribs half-way and covering back the tray with tin foil. 
  5. In the last 10 minutes, remove the tin foil and brush the ribs with some ketchup or barbeque sauce. Turn up the heat and cook in order to create a glaze.


Meanwhile, you can cook the spuds by, you’ve guessed it, frying them in goose fat. Start of by cooking them on high heat for a couple of minutes, in order to get some color, then reduce the heat to medium and cook for around 15-20 minutes, until you get a golden brown color on all sides.


The salad helps the meat and the potatoes tone down on the fatty note. Just make a vinaigrette with the juice of half a lemon, 3 tbs. of olive oil, 1 tbs. of red wine vinegar, 1 tsp. of mustard, salt and pepper. Mix the result with the salad leaves of your choice – choose some crunchy ones, the beet and pumpkin seeds.
This meal, that you’ve just got – pun intended, screams for some Cabernet or a nice, red ale, so take your pick with the alcohol.  A full, heart meal that can get you ready for a lazy weekend at home, perhaps in the company of some chicken wings? Because that’s the second reason God gave you fingers.


Guys, we try and give you in every recipe we post here our honest and explicit experience with food, and any feed-back or tips for further improving any dish is well appreciated. So feel free to comment, criticize or like any post here, can’t wait to be hearing from you!


Enjoy,


Thursday, February 6, 2014

Homemade Pizza- 3 Amazing Versions + Pizza Dough Recipe | You've Got Meal!


I honestly think that fast food has gained a far too bad reputation than it deserves. Pizza, hamburgers, kebabs, fries, all these food industry bad boys can be redeemed with just a little ingenuity and effort into some great tasting healthy meals. From all the choices, pizza is my favorite for cooking at home. It’s simple, delicious, let’s you combine a lot of incredible flavors and, if you make your own dough, it gives you that rewarding feeling that you get when baking.

In this case, I used the recipe for the dough from the Jamie Oliver site, except I halved the quantities he suggested, meaning I used:
  • 500 grams of 000 flour, 
  • 7 grams of dried yeast (that’s basically a small dose that you can buy individually), 
  • 1 tbs. sugar, 
  • 1 tsp. fine salt, 
  • 2 tbs. olive oil, 
  • 325 ml of warm water. 


  1. Sieve the flour in a large, deep pan (I tried doing this on a work surface but I ended up making a giant mess in the kitchen), add the salt. 
  2. In a separate bowl, mix the yeast with the sugar, olive oil and the warm water. 
  3. After leaving the wet mixture sit for a couple of minutes, pour it in a well in the middle of the flour and start bringing in the sides into the middle, gradually. 
  4. Use your hands to knead the dough until you get a nice, smooth and elastic result. 
  5. Next, put the dough in a well floured bowl, cover it with a damp cloth and let it rest in a warm room without a draft source for an hour – it should double in size. 
  6. The resulting dough was enough for 3 pizzas with a diameter of 30 cm with a thin base.


The 1st one was with: pancetta, salami, zucchini, broccoli, as seen above. The pancetta was amazing especially when we curled it on the dough and it became just a bit crispy. The broccoli alongside the zucchini made this pizza so special that it was Mrs. G's favourite. Plus, it is healthier than most. I have to mention the broccoli stays just a bit crunchy and that is perfect and you have to use fresh broccoli, as the frozen one might leave some water and make the pizza more runny.  

Mean while, prepare your ingredients for the pizzas. For all 3 pizzas we used some fresh Mozzarella that we crumbled on top. Also, I started by massaging the rolled pizza dough with a very small amount of olive oil (just enough to give it some shine) and relatively thick tomato paste (also used some of the home made paste that we made for this recipe). The cooking time in a hot oven (200 Celsius) was around 10-11 minutes. As another advice from our pizza adventure be careful with the Gorgonzola – don’t use too much and place it near the center of the dough as it tends to melt a lot and get runny. The same rule applies only partially for the fresh mozzarella as it tends to hold its own better, but, again, don’t overdo it, especially near the edges. 


The 2nd one: salami, Gorgonzola, zucchini, mushrooms, onion, as seen above. This one had a classic taste, a nice tangy hint from the Gorgonzola and you can't possible not love mushroom and onion together on a pizza.  


The 3rd one: pancetta, broccoli, zucchini, olives, onions and artichoke hearts, as seen above. Basically the one where I went all out, a true veggie delight on a pancetta bed and topped with cheesy, Mozzarella goodness. 

Super easy, super fast, super fun and super delicious food. And the next time you start taking a look at those menus from your neighborhood pizza place keep in mind that you can take them out of business any time with this kind of tiny effort. Ok, might sound worse than it actually is, a slight exaggeration there, but you get the idea.


Enjoy,


Related Posts Plugin for WordPress, Blogger...